

Post by Gravedust on Oct 17, 2010 14:35:55 GMT -8
AIRSHIP BASICS
Airships are powerful and complex machines that require skill and knowledge to operate correctly. This section will explain their systems and how they relate to each other, as well as the general principles of air combat.
=======================================
COMPARTMENTS
Every airship is made of a series of compartments. Each compartment contains equipment that serves a particular purpose aboard the ship, such as the Bridge, Boiler, Engine rooms, Cannons and many others. When taken all together, the individual compartments determine the overall abilities of the airship.
Here is a stripped-down rendition of how compartments appear in the Ship Diagram:
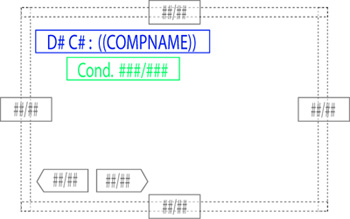
The Blue box contains name of the compartment, and the Green box lists it's Condition.
The Condition reflects how much damage the compartment has taken, and how much damage it can take before it is destroyed completely.
Usually there will be a picture in the background of the compartment to help illustrate what kind of compartment it is.
Crewmembers can travel through the ship by moving from compartment to compartment, and manning the stations of a particular compartment allows them to access the ship's systems in order to operate or attempt to Overcharge them. Any compartments that are horizontally adjacent are considered to be connected and can be travelled through. Compartments can be connected vertically as well by a stairwell.
=======================================
=======================================
COMPARTMENT TYPES
BRIDGE
The control center of the ship, where commands are given to the crew and the vessel itself is maneuvered by it's pilot. The Bridge is also the domain of the Captain, who uses it as a post to command the crew and match wits with other Captains. Unlike most other compartments, which have equipment that will run on it's own if unattended, the bridge should be manned at all times, especially the pilot's post as the ship cannot be controlled if no-one is at the helm. Likewise if the bridge becomes heavily damaged or destroyed, the ship is probably headed for a very nasty crash.
BOILER
In many ways the heart of the ship, the Boiler generates the steam pressure that is used to run the ship's systems. Some larger ships may have more than one if they consistently require a lot of steam power. Boilers are designed to run on their own with no outside intervention, however they can be fed additional fuel manually in order to generate a bit more steam. A boiler malfunction is a very serious issue, as a lack of steam generation can lead to starved ship systems and very easily result in a crash. The boiler compartment also holds the ship's fuel supply, which determines how long it can stay in the air during a mission.
PRESSURE TANK
Just as important as the Boiler, the Pressure tank holds the steam generated by the Boiler. When systems that require steam power are in use, (such as running engines or firing cannons) the necessary steam pressure is drawn from the pressure tank. Pressure tanks are built tough and are generally resistant to damage. Even so, care should be taken to ensure they're well protected and in good working order. A pressure tank rupture is a disaster that is often fatal, either because the ship is destroyed immediately by the explosion, or crashes soon thereafter from lack of steam. A skilled mechanic may be able to pull off some tricks to artificially increase steam pressure inside the tank, but tinkering with the tank is strongly discouraged except to those with higher mechanical aptitudes.
ENGINE
Combat Airships of the era can no longer afford to rely on lighter-than-air gasses to provide lift, as the gas bags are cumbersome and make for easy targets. Instead ships are kept aloft by brute horsepower alone. Fortunately steam engines of the day have plenty to spare. Engines supply the lift needed to keep an airship in flight and maneuver it. Most ships will have at least two engines, but may have more. More engines means more lift and added speed and maneuverability for the ship, but also make the piloting of the craft more difficult. A skilled mechanic can usually find a way of fine-tuning engine settings to produce a bit of extra lift when the situation calls for it.
CANNON
Cannons are the primary weapons aboard airships, and come in a large number of variations in regards to damage, accuracy, ammo capacity and steam needed to fire them. Steam is a renewable resource but all cannons have a finite amount of ammunition, so keeping track of your ammo supply and making your shots count is a crucial facet of ship to ship combat.
TURRET CANNONS
Turret cannons are largely identical to regular cannons, with the exception that they can be rotated to cover a larger portion of the sky, and they're a good deal heavier then vanilla cannons. They'll usually be found on the front of back of a ship, or occasionally stuck up top or on the bottom.
GRAPPLES
Grapples are a versatile combination of grabbing claw, magnet, and sunction cup. They are used to grab and lift objects and cargo from the ground, as well as latch onto enemy ships on order to try to hold them in place or send over a boarding party.
CARGO HOLDS
Cargo holds are designed to.. Hold cargo, which is pretty self explanatory. Ships without holds will be unable to pick up cargo during missions. Any cargo that is loaded over the course of the mission will occury a slot in the cargo hold. The number of available slots per hold compartment can vary, but usually it will be between 8 and 12. When a ship sets down to load cargo, make sure you have some crew in the hold in advance. Crewmembers with high strength are best as they can carry more cargo at once. If the cargo hold is not on the lowest deck, or isn't equipped with a Cargo Hatch, loading can take a little longer.
When holds are damaged there is a chance that cargo slots, and the cargo in them, can be destroyed.
BUNKS
Bunks are the sleeping and living quarters aboard ship, allowing crews to be well fed and rested while travelling. For every day a crew must travel to get to it's destination, a penalty to their stats accumulates. Bunks can reduce this penalty, or even turn it into a positive bonus if the acommodations are nice enough. Each bunk has a maximum capacity, however, and if the number of crewmembers exceeds the number of bunks, then the bonus will not apply to those without a bunk.
AMMUNITION MAGAZINE
Magazines are specially designed to store large quantities of ammunition while minimizing the chance of an explosion. Generally they are found on ships with cannons that fire large shells and have a low ammunition capacity. When those cannons get low on ammo it's time for someone to make a trip to the mazagine and haul more ammo to the gun.
DAMAGE CONTROL CENTER
Damage control centers contain a number of readouts and controls that can help make repairs and firefighting efforts made by other people elsewhere in the ship more effective. In order to provide any benefit they must be manned, and ideally by someone with a decent amount of firefighting or repair experience themselves, so they know what to do in order to help. Placing a repair or firefighting or repair expert in this position however can be somewhat of a waste, as there's an upper limit to the amound of aid that can be given remotely.
+MORE
There are more compartments that have not been included in ships yet, or are not finished with testing. They will be added here as they become available in-game.
===================================
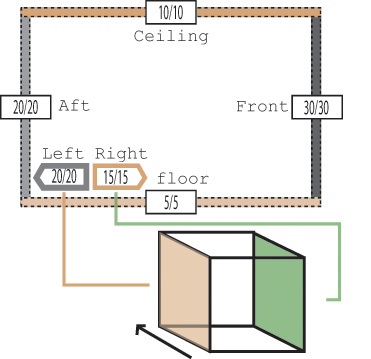
BULKHEADS
Bulkheads protect the Airship by absorbing damage from cannon shots and other destructive forces, and also strengthen the structure of the airship, allowing it to travel faster without breaking up. Bulkheads are indicated as solid bars on the ship diagram, and will have an associated box that indicates their strength.
===================================
===================================
OVERCHARGING
Most equipment on an airship is built to operate at a certain level, but in many cases they can be manipulated to work above and beyond their usual range of operation, increasing the output of the machine by up to 25% in most cases. Overcharging takes 1 Action and any single machine can only be Overcharged once in a round. Cannons are the exception, and can be Overcharged once for every time they are fired.
Overchargeable Systems:
Engine (Increases Engine Power)
Cannon (Increases shot Damage and range)
Grappler (Increases Grapple Power)
Pressure Tank (Increases Pressure)
The results of Overcharging depend on the user's Mechanical skills, and if their skill is low it's possible for an Overcharge attempt to have no effect or even cause a Malfunction. Pressure tanks are notorious for being tempermental about being Overcharged, so it may be best to keep inexperienced crew away from them. Attempting to Overcharge damaged equipment increases the chance of a malfunction as well.
===================================
FLIGHT
Controlling the flight of an airship is a complicated process that depends on a number of factors:
+Engine Power
Engine power is what keeps the airship aloft, and what moves it around the combat map. Moving the ship or turning it expends some amount of power, and when no power is left the ship can no longer be maneuvered that round. Engine Power is generated by the engines and replenishes itself fully at the beginning of every round. (Though engine power output can be affected by malfunctions or Overcharging) Very generally, it can be said that the more engine power a ship has, the further it can be flown and the more maneuvers are available to it, though heavier ships require more power to move than lighter ones.
The amount of engine power needed for a given maneuver is listed on the Ship Diagram for reference, under the heading of Flight.
Each round an airship is in flight, it requires a certain amount of power in order to stay in the air. This amount is subtracted automatically at the beginning of the airship's turn, and the rest is available to make maneuvers with.
If there is not enough engine power (or steam pressure) to pay this initial cost, the airship will stall out and begin losing altitude, which could be the precursor to a crash.
+Steam Pressure
Every time a ship makes a maneuver that costs Engine Power, an equal amount of Steam Pressure is consumed from the ship's pressure tank. (The steam is used to drive the Engines) Generally a pilot will be more limited by the amount of Engine Power available rather than steam pressure, but in certain tight situations it may be best to go easy on maneuvering in order to conserve pressure for firing cannons, or to build up a surplus to be used later.
+Piloting Skill
In addition to Engine power and Steam, the last limiting factor is the Pilot's skill, though this can be stretched, whereas the other two can not. Each maneuver a ship can perform has a point value based on it's difficulty. The total point value of all moves made in that turn is used as a difficulty roll against the pilot's skill:
[D100+Piloting] Vs. [Total Maneuvering Points]
A success means everything is executed exactly as the pilot intends. A failure means the airship is mishandled and goes out of control, resulting in crew injury or perhaps even a crash.
The amount of Manuevering Points each maneuver is worth varies from ship to ship, and is displayed in the Ship Diagram under the heading Piloting, for reference.
===================================
===================================
AIRSHIP MANEUVERS
-
+Forward:
Moves the airship forward 1 movent space's worth of distance in the direction it is facing.
+Reverse:
Moves the airship forward 1 movent space's worth of distance in the opposite direction of it's facing.
+Turn:
A turn can be made in increments of 45 degrees (up to 180 degrees), and rotate the facing of the airship. After making a turn, an airship must move forward at least 1 movement space before it can turn again in the same round. (This simulates making a wider, slower turn instead of a short violent one.) A bigger turn is much harder than several smaller ones, so if your skill is not high it may be best to make incremental turns of 45 or 90 degrees.
+Lateral:
Moves the airship 1 space perpendicular to it's facing.
+Ascend:
Increases the Altitude of the Airship by 1 vert.
+Descend:
Decreases the Altitude of the Airship by 1 vert.
+Dive:
Pitches the airship forward, moving 1 movement space forward and 1 vert down. This is a difficult maneuver, but a good way to cover a lot of ground quickly for very little steam cost, if you have the altitude and piloting skill for it.
==========================================
==========================================
ALTITUDE
Altitude is measured in Verts, (1 Vert being about 500 feet in game terms) Higher altitude allows you to fly over ground features, and can provide a strategic advantage over enemies if they are lower than you, since climbing is an expensive exercise in terms of steam and engine power.
A ship can be at a range of altitudes between 0 (sea level) and 20.
Remember that at times the ground itself may have an altutide, so you may need to increase your height to match unless you're comfortable with flying low. Low-altitude flying carries an increased risk of a crash if there is a piloting error.
==========================================
==========================================
OVERSPEED
In some cases an Airship can travel faster than it's design intended, which is called Overspeed. Each ship's Overspeed is listed (in movement spaces) in it's Flight Box or in it's Overall Stats. If a ship travels further than it's Overspeed rating, it's compartments can suffer malfunctions.
Some tougher-built ships can handle a bit of Overspeed under certain situations, use your judgement and make it a calculated risk.
===========================================
===========================================
DECLARING PILOT MANEUVERS
When indicating desired piloting maneuvers, it's easiest to list each maneuver in the order it should be performed.
For example:
Turn right 45 degrees
Move forward 4 spaces
Descend 2 Verts
etc...
If your ship is Overcharging it's engines, you won't know how well the Overcharge may suceed and how much engine power you may have to deal with. In cases such as these it's fine to guess how much power you'll have available. The ship will simply stop and hover when it comes up against the limit of it's Power, it won't stall or experience any negative effect. So feel free to make 'best case scenario' movement orders. Your pilot will do as as he or she can with the power available.
Additionally when dealing with uncertain power levels (or if you just don't want to do the math) it's acceptable to use statements such as 'Ascend as much as possible on available power.' Or 'go forward as much as possible on available power' though you should be careful to avoid making your pilot's rolls too difficult via this method, as sometimes their earnestness in wanting to follow your commands overrides their common sense, and sometimes Overcharging can grant a significant amount of power. Pilots can also exceed a ship's Overspeed limit if they have enough power and their orders tell them to do so.
=============================================
=============================================
EVASIVE MANEUVERS
In combat, pilots maneuver their ship in a way that makes it harder to hit by enemy gunners. This adds an Evasion Modifier penalty to attacks against the ship. Evasive maneuvering is based on a ship's power to weight ratio and the skill of it's pilot.
If a ship is unpiloted, out of control, grounded or otherwise immobilized, it does not benefit from evasive maneuvering.
=============================================
=============================================
GUNNERY
Firing a shot with Cannon requires 1 Action on the part of it's Gunner (The cannon must be manned, obviously) so cannons may be fired twice per round, if the gunner has enough Actions for it. Engineers or other characters with Mechanical skill can attempt to Overcharge the cannon in order to make it do more damage per shot that round. The Gunner may also try to Overcharge the cannon themselves, though it takes an Action to do so.
+Firing Arcs
There are two primary kinds of cannons, Stationary, and Turret. Stationary Cannons are oriented towards the front, back, or sides of the ship. Stationary Cannons have a limited arc of fire, based on where they are positioned:
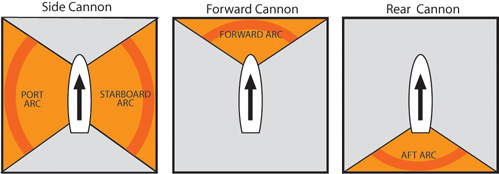
Forward-facing cannons cannons can hit targets within the Forward Arc, and rear-facing cannons can hit targets within the Aft Arc. (As seems logical.)
Side mounted cannons may fire on either the Port Arc or Starboard Arc, but not both at once. Side-mounted cannons must be Traversed from one arc to another, which costs an Action on the part of the gunner operating it. Meaning that a Gunner gives up a potential shot by having to traverse the cannon, so it's best to point them in the direction you expect the enemy to be in a turn in advance to take advantage of both shots.
+Turreted Cannons
Turret cannons are largely identical to regular cannons, with the exception that they can be rotated to cover multiple arcs of fire. Put simply, turrets can fire to the side as well as to the front or rear, depending on location. This allows them to take part in broadsides as well as hit the forward or rear arcs.

Turrets at the front of the ship can cover the Forward Arc, Forward Port arc and Forward Starboard Arc.
Turrets at the rear of the ship can cover the Aft Art, Aft Port Arc and Aft Starboard Arc.
If the turret is the only compartment on a deck, it can rotate a full three hundred and sixty degrees and cover all firing arcs. These will be marked as "360 Cannons"
Turrets will still need to be Traversed from one possible firing arc to another, which takes an Action.
+Range
Range plays an important part in Cannoneering. Targets are easier to hit the closer they are, as one would expect. But also, the further a shot has to go to reach it's target, the less damage it does when it hits. (Damage is decreased by 1 for every movement square between the gun and it's target, all the way down to 0.) Larger guns with bigger shells have a further effective range.
+Range Of Engagement (ROE)
There is a huge variation in range during airship combat, from near point-blank to targets thousands of yards away. Firing accurately requires calibrating a cannon's gunsight to a specific range to take into account the many factors that can effect a shell's trajectory. As a commander you should indicate the distance you want your gunners to calibrate for. This is called setting a Range Of Engagement. The closer a target actually is to the ROE you specify, the better your chances of hitting it. For evey square of difference between the ROE and the actual distance to the target, a small penalty will be applied. Setting an ROE is equal parts strategic thinking and guessing game, but using it intelligently will improve the results of your gunnery dramatically.
+Firing Orders:
There are two main ways of telling your gunner what target to shoot at; General Fire, and Targeted Fire.
General Fire will cause your gunner to fire upon the first target that enters within it's ROE. If there are multiple targets inside the ROE when the ship's turn comes, the cannon will engage the closest one, even it it has to traverse to do so. If no targets venture within the gun's ROE then the cannon will not fire. General Fire is a flexible technique, and a good one to use if you aren't sure what you enemy may do and where it might pop up next. If you want a cannon to engage using General Fire, simply supply a ROE, and no specific target.
Targeted fire causes your gunner to focus on a specific vessel to fire on. Since the gunner is tracking a specific target instead of keeping an eye on the whole sky, they gain a small bonus to their cannoneering skill when they fire. As with General Fire an ROE is set, but the cannon will always fire on it's target regardles of how close or far it is. (The exceptions being if the target is out of the cannon's field of fire, or out of it's range entirely) Targeted Fire is a good method to use when coordinating attacks on a particular target, and slightly more accurate than General fire. If you want a cannon to engage using Targeted Fire, supply an ROE and a target you want the cannon to fire at.
In all cases, firing orders and ROE can be set independently for each cannon.
+Called Shots
In situations where airships are adjacent to another (1 movement space or less apart) or when a target is so large and a gunner so skilled that a miss is not possible, a Gunner may make a Called Shot against a particular compartment of a ship. A successful Called Shot means the shot hits the targetted compartment, Otherwise it will hit a randomly determined adjacent compartment. Note that if the target compartment is at the edge of a ship, the random target selection caused by a failed roll can cause the shot to miss.
It may be wise to specify a Called Shot compartment for your Gunners with every shot, in case the situation for one happens unexpectedly. If a Called Shot situation arises and a compartment has been selected, the shot location will be determined randomly as normal.
An example of Targeting orders:
"Gun 3, traverse to port side, and attack 'Ship X', RoE 10. Aim for Compartment D2C5"
=============================================
=============================================
GRAPPLING
Grappling allows one ship to attach itself to another, making it possible to move supplies or crewmembers from one to another. In less friendly circumstances they can be used to land boarding parties or hold a ship in place. Grappling another ship requires that it be adjacent to the grappling ship, and the Grappler must be manned, preferably by someone with a high Cannoneering skill. Once a grapple has been fired, it requires a continuous stream of pressure to be expended for every round it is in operation. Grapples have identical fIring arcs as Stationary Cannons.
Grapple shots are made in an identical manner to Called Shots, you should indicate what compartment you want the grapple fired at. A success with the roll means the Grapple affixes to the intended compartment, otherwise the target may be off by a compartment or two. You can issue orders to the effect that if the first shot fails to hit exactly the right compartment, the grappler should disengage and try again.
It's important to note that when ships are Grappled together their hulls will be almost touching, so it's unwise (and generally impossible) for the two to exchange cannon fire until the Grapple is broken. Other ships may target either grappled ship, however if they miss their intended target they stand a chance of instead hitting the ship that is grappled to it.
When grappled, the ship with the highest total engine power determines the movement of both ships, though they have to 'drag' the other ship along with them, and maneuvers aside from staying aloft will require an enormous amount of engine power.
A grappled ship can (and probably should) try to break free of the grapple via a piloting roll. Larger, more powerful ships have a better chance of breaking free than smaller ones, though the power of the grapple plays a role as well. Grapples can be Overcharged for greater holding power. The ship doing the grappling can choose to break the grapple at any time, and if the grappling station become unmanned (such as the operator is killed) or does not have sufficiant steam to continue operating, the grapple is broken automatically as well.
Characters can exit one ship through the Grappling compartment and walk across the grapple to the other ship. Crossing a grapple in friendly conditions does not require a roll, however if the ships are not friendly it requires an Agility roll to make it across successfully. Crossing the Grapple takes 1 Action. If the grapple hits a compartment with a destroyed outer bulkhead, Crewmembers crossing the grapple can enter directly into the interior of the other ship through the hole! Otherwise they are stopped by the armor plating, until they can employ Sapper Bombs or Cutting Torches to destroy the armored bulkhead and gain entry. Note that any characters doing work out on the grapple like this are susceptible to falling off the grapple if they have low Agility, and if the grapple breaks for any reason while they are out on it, they will all get tossed into the wild blue as well. Hope you gave them parachutes.
Objects on the ground such as Cargo (and people!) can be can be picked up and lifted by the grapple. Grabbing objects off the ground requires the airship be at the same altitude as the ground, though it can remain in motion and airborne (and hence retain it's Evasive Maneuvering bonus.) As long as the ship passes over the location of the object to be grappled at the right altitude, an attempt can be made.
=============================================
DAMAGE CONTROL
Whenever a Compartment takes damage there is a chance a Malfunction will occur. Malfunctions (Malfs) can have a variety of effects, but in general will negatively effect the performance of the compartment, and can cause injury to the crew via explosion or fire. The likelyhood of a malf occuring depends on the type and construction of the compartment (some ships and compartments are just build more solidly than others) and how much damage the compartment has already sustained. Machinery that has already been kicked around a little is more likely to malf, and in worse ways.
When a Malfunction occurs, it's up to the crew to fix it. Each malfunction will have a Severity. The Severity is basically a measurement of how hard the Malf is to fix, and should give an idea of who you ought to send to try and fix it. Characters with a low Repair skill might be able to handle a low-severity malf, but higher ones should be tacked by bonafide Engineers otherwise they might take an excessive amount of time to get under control. Sucessful rolls will either fix the malf entirely or lower it's Severity. Failing rolls have no effect. (But at least they don't make things worse.) Attempting to Repair a Malfunction takes 1 Action.
=============================================
FIREFIGHTING
Fire represents a very dangerous condition aboard ship. It can damage compartments and injure crew, cause malfunctions and spread through open areas of the ship to cause even more damage. If left unattended, fires will grow more severe over time until they entirely destroy the compartment they're in. Any character that enters or crosses through a compartment that is on fire has a chance to be injured by the intense heat and smoke inhalation. Additionally, any character in a compartment that is on fire at the beginning of a round has a chance to take damage.
Fires are handled in the same manner as Malfunctions. Each has a severity that is a measurement of how hard it is to extinguish. The main difference is that a fire's Severity will actually increase over time as it consumes the compartment, so it's best to handle them early, while they are still manageable.
Crew sent to extinguish a fire ought to have a high Firefighting skill, as this both increases the likelihood of reducing the severity of the fire. Toughness is also helpful in resisting the effects of fire.
Airships are powerful and complex machines that require skill and knowledge to operate correctly. This section will explain their systems and how they relate to each other, as well as the general principles of air combat.
=======================================
COMPARTMENTS
Every airship is made of a series of compartments. Each compartment contains equipment that serves a particular purpose aboard the ship, such as the Bridge, Boiler, Engine rooms, Cannons and many others. When taken all together, the individual compartments determine the overall abilities of the airship.
Here is a stripped-down rendition of how compartments appear in the Ship Diagram:
The Blue box contains name of the compartment, and the Green box lists it's Condition.
The Condition reflects how much damage the compartment has taken, and how much damage it can take before it is destroyed completely.
Usually there will be a picture in the background of the compartment to help illustrate what kind of compartment it is.
Crewmembers can travel through the ship by moving from compartment to compartment, and manning the stations of a particular compartment allows them to access the ship's systems in order to operate or attempt to Overcharge them. Any compartments that are horizontally adjacent are considered to be connected and can be travelled through. Compartments can be connected vertically as well by a stairwell.
=======================================
=======================================
COMPARTMENT TYPES
BRIDGE
The control center of the ship, where commands are given to the crew and the vessel itself is maneuvered by it's pilot. The Bridge is also the domain of the Captain, who uses it as a post to command the crew and match wits with other Captains. Unlike most other compartments, which have equipment that will run on it's own if unattended, the bridge should be manned at all times, especially the pilot's post as the ship cannot be controlled if no-one is at the helm. Likewise if the bridge becomes heavily damaged or destroyed, the ship is probably headed for a very nasty crash.
BOILER
In many ways the heart of the ship, the Boiler generates the steam pressure that is used to run the ship's systems. Some larger ships may have more than one if they consistently require a lot of steam power. Boilers are designed to run on their own with no outside intervention, however they can be fed additional fuel manually in order to generate a bit more steam. A boiler malfunction is a very serious issue, as a lack of steam generation can lead to starved ship systems and very easily result in a crash. The boiler compartment also holds the ship's fuel supply, which determines how long it can stay in the air during a mission.
PRESSURE TANK
Just as important as the Boiler, the Pressure tank holds the steam generated by the Boiler. When systems that require steam power are in use, (such as running engines or firing cannons) the necessary steam pressure is drawn from the pressure tank. Pressure tanks are built tough and are generally resistant to damage. Even so, care should be taken to ensure they're well protected and in good working order. A pressure tank rupture is a disaster that is often fatal, either because the ship is destroyed immediately by the explosion, or crashes soon thereafter from lack of steam. A skilled mechanic may be able to pull off some tricks to artificially increase steam pressure inside the tank, but tinkering with the tank is strongly discouraged except to those with higher mechanical aptitudes.
ENGINE
Combat Airships of the era can no longer afford to rely on lighter-than-air gasses to provide lift, as the gas bags are cumbersome and make for easy targets. Instead ships are kept aloft by brute horsepower alone. Fortunately steam engines of the day have plenty to spare. Engines supply the lift needed to keep an airship in flight and maneuver it. Most ships will have at least two engines, but may have more. More engines means more lift and added speed and maneuverability for the ship, but also make the piloting of the craft more difficult. A skilled mechanic can usually find a way of fine-tuning engine settings to produce a bit of extra lift when the situation calls for it.
CANNON
Cannons are the primary weapons aboard airships, and come in a large number of variations in regards to damage, accuracy, ammo capacity and steam needed to fire them. Steam is a renewable resource but all cannons have a finite amount of ammunition, so keeping track of your ammo supply and making your shots count is a crucial facet of ship to ship combat.
TURRET CANNONS
Turret cannons are largely identical to regular cannons, with the exception that they can be rotated to cover a larger portion of the sky, and they're a good deal heavier then vanilla cannons. They'll usually be found on the front of back of a ship, or occasionally stuck up top or on the bottom.
GRAPPLES
Grapples are a versatile combination of grabbing claw, magnet, and sunction cup. They are used to grab and lift objects and cargo from the ground, as well as latch onto enemy ships on order to try to hold them in place or send over a boarding party.
CARGO HOLDS
Cargo holds are designed to.. Hold cargo, which is pretty self explanatory. Ships without holds will be unable to pick up cargo during missions. Any cargo that is loaded over the course of the mission will occury a slot in the cargo hold. The number of available slots per hold compartment can vary, but usually it will be between 8 and 12. When a ship sets down to load cargo, make sure you have some crew in the hold in advance. Crewmembers with high strength are best as they can carry more cargo at once. If the cargo hold is not on the lowest deck, or isn't equipped with a Cargo Hatch, loading can take a little longer.
When holds are damaged there is a chance that cargo slots, and the cargo in them, can be destroyed.
BUNKS
Bunks are the sleeping and living quarters aboard ship, allowing crews to be well fed and rested while travelling. For every day a crew must travel to get to it's destination, a penalty to their stats accumulates. Bunks can reduce this penalty, or even turn it into a positive bonus if the acommodations are nice enough. Each bunk has a maximum capacity, however, and if the number of crewmembers exceeds the number of bunks, then the bonus will not apply to those without a bunk.
AMMUNITION MAGAZINE
Magazines are specially designed to store large quantities of ammunition while minimizing the chance of an explosion. Generally they are found on ships with cannons that fire large shells and have a low ammunition capacity. When those cannons get low on ammo it's time for someone to make a trip to the mazagine and haul more ammo to the gun.
DAMAGE CONTROL CENTER
Damage control centers contain a number of readouts and controls that can help make repairs and firefighting efforts made by other people elsewhere in the ship more effective. In order to provide any benefit they must be manned, and ideally by someone with a decent amount of firefighting or repair experience themselves, so they know what to do in order to help. Placing a repair or firefighting or repair expert in this position however can be somewhat of a waste, as there's an upper limit to the amound of aid that can be given remotely.
+MORE
There are more compartments that have not been included in ships yet, or are not finished with testing. They will be added here as they become available in-game.
===================================
BULKHEADS
Bulkheads protect the Airship by absorbing damage from cannon shots and other destructive forces, and also strengthen the structure of the airship, allowing it to travel faster without breaking up. Bulkheads are indicated as solid bars on the ship diagram, and will have an associated box that indicates their strength.
===================================
===================================
OVERCHARGING
Most equipment on an airship is built to operate at a certain level, but in many cases they can be manipulated to work above and beyond their usual range of operation, increasing the output of the machine by up to 25% in most cases. Overcharging takes 1 Action and any single machine can only be Overcharged once in a round. Cannons are the exception, and can be Overcharged once for every time they are fired.
Overchargeable Systems:
Engine (Increases Engine Power)
Cannon (Increases shot Damage and range)
Grappler (Increases Grapple Power)
Pressure Tank (Increases Pressure)
The results of Overcharging depend on the user's Mechanical skills, and if their skill is low it's possible for an Overcharge attempt to have no effect or even cause a Malfunction. Pressure tanks are notorious for being tempermental about being Overcharged, so it may be best to keep inexperienced crew away from them. Attempting to Overcharge damaged equipment increases the chance of a malfunction as well.
===================================
FLIGHT
Controlling the flight of an airship is a complicated process that depends on a number of factors:
+Engine Power
Engine power is what keeps the airship aloft, and what moves it around the combat map. Moving the ship or turning it expends some amount of power, and when no power is left the ship can no longer be maneuvered that round. Engine Power is generated by the engines and replenishes itself fully at the beginning of every round. (Though engine power output can be affected by malfunctions or Overcharging) Very generally, it can be said that the more engine power a ship has, the further it can be flown and the more maneuvers are available to it, though heavier ships require more power to move than lighter ones.
The amount of engine power needed for a given maneuver is listed on the Ship Diagram for reference, under the heading of Flight.
Each round an airship is in flight, it requires a certain amount of power in order to stay in the air. This amount is subtracted automatically at the beginning of the airship's turn, and the rest is available to make maneuvers with.
If there is not enough engine power (or steam pressure) to pay this initial cost, the airship will stall out and begin losing altitude, which could be the precursor to a crash.
+Steam Pressure
Every time a ship makes a maneuver that costs Engine Power, an equal amount of Steam Pressure is consumed from the ship's pressure tank. (The steam is used to drive the Engines) Generally a pilot will be more limited by the amount of Engine Power available rather than steam pressure, but in certain tight situations it may be best to go easy on maneuvering in order to conserve pressure for firing cannons, or to build up a surplus to be used later.
+Piloting Skill
In addition to Engine power and Steam, the last limiting factor is the Pilot's skill, though this can be stretched, whereas the other two can not. Each maneuver a ship can perform has a point value based on it's difficulty. The total point value of all moves made in that turn is used as a difficulty roll against the pilot's skill:
[D100+Piloting] Vs. [Total Maneuvering Points]
A success means everything is executed exactly as the pilot intends. A failure means the airship is mishandled and goes out of control, resulting in crew injury or perhaps even a crash.
The amount of Manuevering Points each maneuver is worth varies from ship to ship, and is displayed in the Ship Diagram under the heading Piloting, for reference.
===================================
===================================
AIRSHIP MANEUVERS
-
+Forward:
Moves the airship forward 1 movent space's worth of distance in the direction it is facing.
+Reverse:
Moves the airship forward 1 movent space's worth of distance in the opposite direction of it's facing.
+Turn:
A turn can be made in increments of 45 degrees (up to 180 degrees), and rotate the facing of the airship. After making a turn, an airship must move forward at least 1 movement space before it can turn again in the same round. (This simulates making a wider, slower turn instead of a short violent one.) A bigger turn is much harder than several smaller ones, so if your skill is not high it may be best to make incremental turns of 45 or 90 degrees.
+Lateral:
Moves the airship 1 space perpendicular to it's facing.
+Ascend:
Increases the Altitude of the Airship by 1 vert.
+Descend:
Decreases the Altitude of the Airship by 1 vert.
+Dive:
Pitches the airship forward, moving 1 movement space forward and 1 vert down. This is a difficult maneuver, but a good way to cover a lot of ground quickly for very little steam cost, if you have the altitude and piloting skill for it.
==========================================
==========================================
ALTITUDE
Altitude is measured in Verts, (1 Vert being about 500 feet in game terms) Higher altitude allows you to fly over ground features, and can provide a strategic advantage over enemies if they are lower than you, since climbing is an expensive exercise in terms of steam and engine power.
A ship can be at a range of altitudes between 0 (sea level) and 20.
Remember that at times the ground itself may have an altutide, so you may need to increase your height to match unless you're comfortable with flying low. Low-altitude flying carries an increased risk of a crash if there is a piloting error.
==========================================
==========================================
OVERSPEED
In some cases an Airship can travel faster than it's design intended, which is called Overspeed. Each ship's Overspeed is listed (in movement spaces) in it's Flight Box or in it's Overall Stats. If a ship travels further than it's Overspeed rating, it's compartments can suffer malfunctions.
Some tougher-built ships can handle a bit of Overspeed under certain situations, use your judgement and make it a calculated risk.
===========================================
===========================================
DECLARING PILOT MANEUVERS
When indicating desired piloting maneuvers, it's easiest to list each maneuver in the order it should be performed.
For example:
Turn right 45 degrees
Move forward 4 spaces
Descend 2 Verts
etc...
If your ship is Overcharging it's engines, you won't know how well the Overcharge may suceed and how much engine power you may have to deal with. In cases such as these it's fine to guess how much power you'll have available. The ship will simply stop and hover when it comes up against the limit of it's Power, it won't stall or experience any negative effect. So feel free to make 'best case scenario' movement orders. Your pilot will do as as he or she can with the power available.
Additionally when dealing with uncertain power levels (or if you just don't want to do the math) it's acceptable to use statements such as 'Ascend as much as possible on available power.' Or 'go forward as much as possible on available power' though you should be careful to avoid making your pilot's rolls too difficult via this method, as sometimes their earnestness in wanting to follow your commands overrides their common sense, and sometimes Overcharging can grant a significant amount of power. Pilots can also exceed a ship's Overspeed limit if they have enough power and their orders tell them to do so.
=============================================
=============================================
EVASIVE MANEUVERS
In combat, pilots maneuver their ship in a way that makes it harder to hit by enemy gunners. This adds an Evasion Modifier penalty to attacks against the ship. Evasive maneuvering is based on a ship's power to weight ratio and the skill of it's pilot.
If a ship is unpiloted, out of control, grounded or otherwise immobilized, it does not benefit from evasive maneuvering.
=============================================
=============================================
GUNNERY
Firing a shot with Cannon requires 1 Action on the part of it's Gunner (The cannon must be manned, obviously) so cannons may be fired twice per round, if the gunner has enough Actions for it. Engineers or other characters with Mechanical skill can attempt to Overcharge the cannon in order to make it do more damage per shot that round. The Gunner may also try to Overcharge the cannon themselves, though it takes an Action to do so.
+Firing Arcs
There are two primary kinds of cannons, Stationary, and Turret. Stationary Cannons are oriented towards the front, back, or sides of the ship. Stationary Cannons have a limited arc of fire, based on where they are positioned:
Forward-facing cannons cannons can hit targets within the Forward Arc, and rear-facing cannons can hit targets within the Aft Arc. (As seems logical.)
Side mounted cannons may fire on either the Port Arc or Starboard Arc, but not both at once. Side-mounted cannons must be Traversed from one arc to another, which costs an Action on the part of the gunner operating it. Meaning that a Gunner gives up a potential shot by having to traverse the cannon, so it's best to point them in the direction you expect the enemy to be in a turn in advance to take advantage of both shots.
+Turreted Cannons
Turret cannons are largely identical to regular cannons, with the exception that they can be rotated to cover multiple arcs of fire. Put simply, turrets can fire to the side as well as to the front or rear, depending on location. This allows them to take part in broadsides as well as hit the forward or rear arcs.
Turrets at the front of the ship can cover the Forward Arc, Forward Port arc and Forward Starboard Arc.
Turrets at the rear of the ship can cover the Aft Art, Aft Port Arc and Aft Starboard Arc.
If the turret is the only compartment on a deck, it can rotate a full three hundred and sixty degrees and cover all firing arcs. These will be marked as "360 Cannons"
Turrets will still need to be Traversed from one possible firing arc to another, which takes an Action.
+Range
Range plays an important part in Cannoneering. Targets are easier to hit the closer they are, as one would expect. But also, the further a shot has to go to reach it's target, the less damage it does when it hits. (Damage is decreased by 1 for every movement square between the gun and it's target, all the way down to 0.) Larger guns with bigger shells have a further effective range.
+Range Of Engagement (ROE)
There is a huge variation in range during airship combat, from near point-blank to targets thousands of yards away. Firing accurately requires calibrating a cannon's gunsight to a specific range to take into account the many factors that can effect a shell's trajectory. As a commander you should indicate the distance you want your gunners to calibrate for. This is called setting a Range Of Engagement. The closer a target actually is to the ROE you specify, the better your chances of hitting it. For evey square of difference between the ROE and the actual distance to the target, a small penalty will be applied. Setting an ROE is equal parts strategic thinking and guessing game, but using it intelligently will improve the results of your gunnery dramatically.
+Firing Orders:
There are two main ways of telling your gunner what target to shoot at; General Fire, and Targeted Fire.
General Fire will cause your gunner to fire upon the first target that enters within it's ROE. If there are multiple targets inside the ROE when the ship's turn comes, the cannon will engage the closest one, even it it has to traverse to do so. If no targets venture within the gun's ROE then the cannon will not fire. General Fire is a flexible technique, and a good one to use if you aren't sure what you enemy may do and where it might pop up next. If you want a cannon to engage using General Fire, simply supply a ROE, and no specific target.
Targeted fire causes your gunner to focus on a specific vessel to fire on. Since the gunner is tracking a specific target instead of keeping an eye on the whole sky, they gain a small bonus to their cannoneering skill when they fire. As with General Fire an ROE is set, but the cannon will always fire on it's target regardles of how close or far it is. (The exceptions being if the target is out of the cannon's field of fire, or out of it's range entirely) Targeted Fire is a good method to use when coordinating attacks on a particular target, and slightly more accurate than General fire. If you want a cannon to engage using Targeted Fire, supply an ROE and a target you want the cannon to fire at.
In all cases, firing orders and ROE can be set independently for each cannon.
+Called Shots
In situations where airships are adjacent to another (1 movement space or less apart) or when a target is so large and a gunner so skilled that a miss is not possible, a Gunner may make a Called Shot against a particular compartment of a ship. A successful Called Shot means the shot hits the targetted compartment, Otherwise it will hit a randomly determined adjacent compartment. Note that if the target compartment is at the edge of a ship, the random target selection caused by a failed roll can cause the shot to miss.
It may be wise to specify a Called Shot compartment for your Gunners with every shot, in case the situation for one happens unexpectedly. If a Called Shot situation arises and a compartment has been selected, the shot location will be determined randomly as normal.
An example of Targeting orders:
"Gun 3, traverse to port side, and attack 'Ship X', RoE 10. Aim for Compartment D2C5"
=============================================
=============================================
GRAPPLING
Grappling allows one ship to attach itself to another, making it possible to move supplies or crewmembers from one to another. In less friendly circumstances they can be used to land boarding parties or hold a ship in place. Grappling another ship requires that it be adjacent to the grappling ship, and the Grappler must be manned, preferably by someone with a high Cannoneering skill. Once a grapple has been fired, it requires a continuous stream of pressure to be expended for every round it is in operation. Grapples have identical fIring arcs as Stationary Cannons.
Grapple shots are made in an identical manner to Called Shots, you should indicate what compartment you want the grapple fired at. A success with the roll means the Grapple affixes to the intended compartment, otherwise the target may be off by a compartment or two. You can issue orders to the effect that if the first shot fails to hit exactly the right compartment, the grappler should disengage and try again.
It's important to note that when ships are Grappled together their hulls will be almost touching, so it's unwise (and generally impossible) for the two to exchange cannon fire until the Grapple is broken. Other ships may target either grappled ship, however if they miss their intended target they stand a chance of instead hitting the ship that is grappled to it.
When grappled, the ship with the highest total engine power determines the movement of both ships, though they have to 'drag' the other ship along with them, and maneuvers aside from staying aloft will require an enormous amount of engine power.
A grappled ship can (and probably should) try to break free of the grapple via a piloting roll. Larger, more powerful ships have a better chance of breaking free than smaller ones, though the power of the grapple plays a role as well. Grapples can be Overcharged for greater holding power. The ship doing the grappling can choose to break the grapple at any time, and if the grappling station become unmanned (such as the operator is killed) or does not have sufficiant steam to continue operating, the grapple is broken automatically as well.
Characters can exit one ship through the Grappling compartment and walk across the grapple to the other ship. Crossing a grapple in friendly conditions does not require a roll, however if the ships are not friendly it requires an Agility roll to make it across successfully. Crossing the Grapple takes 1 Action. If the grapple hits a compartment with a destroyed outer bulkhead, Crewmembers crossing the grapple can enter directly into the interior of the other ship through the hole! Otherwise they are stopped by the armor plating, until they can employ Sapper Bombs or Cutting Torches to destroy the armored bulkhead and gain entry. Note that any characters doing work out on the grapple like this are susceptible to falling off the grapple if they have low Agility, and if the grapple breaks for any reason while they are out on it, they will all get tossed into the wild blue as well. Hope you gave them parachutes.
Objects on the ground such as Cargo (and people!) can be can be picked up and lifted by the grapple. Grabbing objects off the ground requires the airship be at the same altitude as the ground, though it can remain in motion and airborne (and hence retain it's Evasive Maneuvering bonus.) As long as the ship passes over the location of the object to be grappled at the right altitude, an attempt can be made.
=============================================
DAMAGE CONTROL
Whenever a Compartment takes damage there is a chance a Malfunction will occur. Malfunctions (Malfs) can have a variety of effects, but in general will negatively effect the performance of the compartment, and can cause injury to the crew via explosion or fire. The likelyhood of a malf occuring depends on the type and construction of the compartment (some ships and compartments are just build more solidly than others) and how much damage the compartment has already sustained. Machinery that has already been kicked around a little is more likely to malf, and in worse ways.
When a Malfunction occurs, it's up to the crew to fix it. Each malfunction will have a Severity. The Severity is basically a measurement of how hard the Malf is to fix, and should give an idea of who you ought to send to try and fix it. Characters with a low Repair skill might be able to handle a low-severity malf, but higher ones should be tacked by bonafide Engineers otherwise they might take an excessive amount of time to get under control. Sucessful rolls will either fix the malf entirely or lower it's Severity. Failing rolls have no effect. (But at least they don't make things worse.) Attempting to Repair a Malfunction takes 1 Action.
=============================================
FIREFIGHTING
Fire represents a very dangerous condition aboard ship. It can damage compartments and injure crew, cause malfunctions and spread through open areas of the ship to cause even more damage. If left unattended, fires will grow more severe over time until they entirely destroy the compartment they're in. Any character that enters or crosses through a compartment that is on fire has a chance to be injured by the intense heat and smoke inhalation. Additionally, any character in a compartment that is on fire at the beginning of a round has a chance to take damage.
Fires are handled in the same manner as Malfunctions. Each has a severity that is a measurement of how hard it is to extinguish. The main difference is that a fire's Severity will actually increase over time as it consumes the compartment, so it's best to handle them early, while they are still manageable.
Crew sent to extinguish a fire ought to have a high Firefighting skill, as this both increases the likelihood of reducing the severity of the fire. Toughness is also helpful in resisting the effects of fire.