

Post by Gravedust on Jun 12, 2010 0:20:09 GMT -8
AIRSHIP COMBAT
Airship Combat shares many similarities with regular combat, with a few notable exceptions. The biggest is that Airship Combat begins with an Airship Tactics roll. This roll is between whoever is in charge of each ship, and will determine the order the Airships will act. At some times it's advantageous to go first in an combat round, and other times later. The winner of the Airship Tactics roll gets to determine whether they want to go first or last.
The first ship to act will then declare actions for it's crew, and whoever else may be aboard will declare Actions as well. Once all Actions have been declared, the effects on the airship (it's movement, firing of guns, etc) will be calculated. Then the next ship's crew will declare their actions, and so on until all ships have gone and the next round begins.
This section will describe the aspects of airship combat.
The Combat Map
The position and altitude of friendly and enemy airships are plotted on the Combat Map, which serves to give an overall view of the situation. A grid is overlaid on the map to make it easier to get a sense of scale and plan moves. Each square is roughly equal to 1 Movement space, but is not exact.
Ships are indicated as black shapes, and have an arrow that indicates facing. The name of the ship will be beneath the shape, and a number indicating the ship's altitude will be alongside. If the battle takes place over land, there will be large numbers indicating the height that land is at.
As an example:
The Status Sheet
The purpose of the status sheet is to provide a display of the condition of the airship as a whole, including strength or armor, damage to any compartments, placement of crew, and the amount of expendables (Fuel, ammunition, etc) remaining.
The Status sheet is updated every combat round to keep track of what's happening inside the ship. Sheets will also be kept for an enemy vessels, but in general you won't be able to see them.
An example of a Status sheet:
The Status Sheet has 4 main features, Overall Stats, The Ship Diagram, the Compartment Stats, and the Hit Table.
The Overall Stats

Overall Stats are a series of basic stats about the ship, mostly useful for comparing one ship's stats to anothers at a glance. They are a simple representation of a ship's overall capabilities.
The Ship Diagram
The ship diagram displays the location and condition of the Compartments on the ship, as well as crew location and visual indicators of damage and malfunctions. It may also have some additional art for flavor.
Compartment Stats
Shows information in each individual compartment, organized by type. The information displayed will vary depending on compartment type.
Hit Table
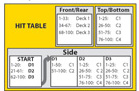
This is used to determine the compartments hit by incoming fire, if the ship is struck.
Bulkheads and Compartments [/size]
Airships are composed of 2 fundamental parts, Bulkheads and Compartments. Bulkheads are structural, providing protection against damage. Compartments are what lies inside the bulkheads, rooms full of machinery that are often times vital parts of an Airship's function.
The Ship Diagram is made from a series of Compartments and Bulkheads.
Bulkheads
A Bulkhead's purpose is to absorb damage. Nothing short of a Cannon or other large explosive has enough power to damage a bulkhead, however once pierced they offer no real protection.
Here you can see an example of some Bulkheads. The number in the center of the bars is it's Armor, the amount of damage the bulkhead can take before it is destroyed. Occasionally the bulkheads are color-coded according to how much damage they can take.
The arrows pointing left and right in the lower-left of the box indicate how much armor remains on the side-planes. The left arrow indicates armor on the port side, the right arrow starboard side.
Compartments
A Compartment's Condition is a measurement of how much damage it can absorb before being destroyed. When a compartment's Condition reaches 0 it is completely wrecked and becomes unusable. Any time a Compartment is damaged there is a chance of a Malfunction occuring. A malfunction can take many forms, but usually they are bad news.
Compartment information is found on the upper left corner:
The blue section lists in the location and name of the Compartment. The C stands for Compartment, D for Deck and is determined by where in the ship the compartment is placed. The topmost deck is Deck 1 with numbers that increase for each deck under it. Compartments are numbered going from Aft to forward. The Name of the compartment can be anything, but will most usually refer to the function of the compartment.
The compartment's Condition is listed below in teal.
Some compartments may have a diagram in the background for flavor instead of just a plain background.
Compartment stats
Each Compartment on the ship will have a box with more information on it, usually grouped to the left or below of the Ship Diagram. Information pertinent to the compartment's operation will be listed. Additionally, if the compartment has a Position which can be manned, it will be listed. Positions can grant stats to the person manning them, or allow them to interface with the ship's systems in order to Overcharge them or perform other actions.
BASIC COMPARTMENT TYPES
While there are many different types of compartments these compartments are crucial to the functioning of an airship:
The Bridge
The Brains of the ship, Orders are given and the ship is piloted from the Bridge.
The Furnace (or Boiler)
Nearly all systems aboard the ship require Steam pressure to run, the Furnace is where this steam is generated.
The Pressure Tank
Stores the predsure generated by the Boiler.
Engines
Convert Steam pressure into the power needed to fly the ship.
MOVEMENT INSIDE AND OUTSIDE AIRSHIPS
All Compartments that are horizontally adjacent to each other are considered to be connected, and can be moved between at a cost of 1 Action as per normal.
Vertically adjacent Compartments may be traversed if they are connected by a Stairwell.
Hatches and Cargo Hatches provide access to the inside of the ship from outside, and vice versa, if they are open. They are closed by default. To board or exit a ship, there must be a Hatch or Cargo Hatch on the lowermost deck of the ship.
Decks
Decks are areas outside the ship that are intended to be walked on, and are indicated as green bars above the floor.
If a compartment adjacent to a Deck has a Hatch, the Deck may be accessed from that compartment (and likewise, the ship may be entered via the hatch from the Deck. The same is true of Stairwells that lead to a Deck.
Destroyed compartments
Compartments that have been wrecked are full of broken machinery and wire and as such are difficult to navigates, requiring a roll of [D100+Agility] Vs. [Total Size] to pass through successfully. Failing this roll causes the character to become stuck in the wrecked compartment.
Moving On Decks in Flight
If an airship is in flight with people on the deck, there is a chance they could be swept overboard by the wind. Anyone on deck when the ship moves must make a Roll of [D100+Acrobatics] Vs. [ #movement spaces travelled x 10]
Failing the roll by 10 or less causes the character to be swept over. During their next turn they must use 1 Action to stand up before doing anything else.
Failing by more than 20 causes the character to fall from the ship.
Scaling An Airship's sides
A Character can to climb along the outside of an airship's compartments by making a roll of:
D100+Agility] - [Total Size] Vs. [Difficulty 30]
For every Compartment they intend to travel.
Failing the roll by 10 or less causes the character to become stuck, cancelling the movement.
Failing by more than 20 causes the character to fall from the ship.
If an airship moves while characters are scaling it's sides, each scaling character must make a roll of:
[D100+Agility] - [Total size] Vs. [ # movement spaces travelled x 10]
Failing the roll by 10 or less causes the character to be swept over. During their next turn they must use 1 Action to right themselves before doing anything else.
Failing by more than 20 causes the character to fall from the ship.
Movement on the outside of an airship can be made diagonally.
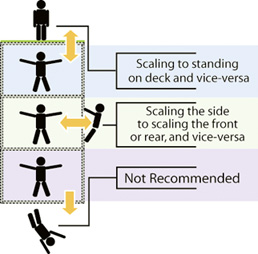
A character can transfer from the front or sides of an airship, or climb up onto the deck as per this diagram:
Attempting to scale off the bottom off the airship is Not Recommended.
Entry through destroyed bulkheads
If a compartment's Bulkhead has been destroyed on the outside of the ship, that compartment can be entered from outside the ship by passing through the destroyed bulkhead as though it were a Hatch.
Changing Decks via destroyed floors/ceilings
If a floor or ceiling bulkhead has been destroyed a Character may pass between the two compartments as though they were connected by a Stairwell.
If Descending they must make a roll of [D100+Agility] Vs. [Total size] to avoid taking 1 point of damage by falling.
If Ascending the must make a roll of [D100+Agility] Vs. [10 +Total size] to avoid becoming stuck and wasting an Action.
Moving across a Compartment with a Destroyed floor
If a Character moves into a compartment with a destroyed floor bulkhead, they must make a roll of [D100+Agility] Vs. [Total size] to avoid falling down a deck and taking 1 point of damage by falling. It is possible to fall off a ship in this manner, by failing to cross the lowest deck of a ship.
PILOTING
Piloting an airship is a crucial and complex job aboard ship, requiring a considerable amount of calculation and strategic thinking on combat. As such it takes an entire round to perform. Piloting can only be done from the Helm Position in the Bridge compartment. If the helm is not manned, the airship cannot be maneuvered in any way.
There are several factors that must be taken into account when Piloting.
-Engine Power
-Steam Pressure
-Their own Piloting Stat
--------
Engine Power
Engine power is what keeps the airship aloft, and what moves it around the combat map. Moving the ship or turning it expends some amount of power, and when no power is left the ship can no longer be maneuvered that round. Engine Power replenishes itself fully at the beginning of every round. (Though it can be affected by malfunctions or Overcharging) Very generally, it can be said that the more engine power a ship has, the further it can be flown and the more maneuvers are available to it, though heavier ships require more power than lighter ones.
The amount of engine power needed for a given maneuver is listed on the Status Sheet under the heading of Flight.
Each round an airship is in flight, it requires a certain amount of power in order to stay in the air. This amount is subtracted automatically at the beginning of tha airship's turn, and the rest is available to make maneuvers with.
If there is not enough engine power (or steam power) to pay this initial cost, the airship will stall out and begin losing altitude, which could be the precursor to a crash. So it pays to husband your resources.
Steam Pressure
Every time a ship makes a maneuver that costs Engine Power, an equal amount of Steam Pressure is consumed from the ship's pressure tank. (The steam is used to drive the engines) Generally a pilot will be more limited by the amount of Engine Power available rather than steam pressure, but in certain tight situations it may be best to go easy in order to conserve pressure for firing cannons, or to build up a surplus to be used later.
Piloting Stat
In addition to Engine power and Steam, the last limiting factor is the Pilot's own skill, though this can be stretched, whereas the other two can not. Each maneuver a ship can perform (which will be covered shortly) will have a point value. The total point value of all moves made in that turn is used as a difficulty roll against the pilot's skill:
[D100+Piloting] Vs. [Total Maneuvering Points]
A success means everything is executed exactly as the pilot intends. A failure means the airship is mishandled and goes out of control, resulting in crew injury or perhaps even a crash.
A pilot can play it safe and only make maneuvers that's total stays within their skill level (under their piloting skill) or they can tempt fate with more maneuvers and increased risk.
The amount of Manuevering Points each maneuver is worth varies from ship to ship, and is displayed in the Status Sheet under the heading Piloting.
Airship Manuevers
-
Forward:
Moves the airship forward 1 movent space's worth of distance in the direction it is facing.
Reverse:
Moves the airship forward 1 movent space's worth of distance in the opposite direction of it's facing.
Turn:
A turn can be made in increments of 45 degrees (up to 180 degrees), and rotate the facing of the airship. After making a turn, an airship must move forward at least 1 movement space before it can turn again int he same round. A bigger turn is much harder than several smaller ones, so if your skill is not high it may be best to make incremental turns of 45 or 90 degrees.
Lateral:
Moves the airship 1 space perpendicular to it's facing.
Ascend:
Increases the Altitude of the Airship by 1 vert.
Descend:
Decreases the Altitude of the Airship by 1 vert.
Dive:
Pitches the airship forward, moving 1 movement space forward and 1 vert down. This is a difficult maneuver, but it's lower steam cost makes it a good way to cover a lot of ground quickly, if you have the altitude and piloting skill for it.
-
Evasive maneuvering
In combat, a skilled pilot can maneuver their ship in a way that makes it harder to hit by enemy gunners by adding a Evasion Modifier penalty to attacks against the ship.
Evasion Modifier = [D100+Airmanship] / [Bulk / 10]
Evasive Maneuvering is calculated as soon as a ship begins it's turn, or is fired upon. It it recalculated every round.
Altitude
Altitude in the game is measured in Verts, (1 Vert being about 500 feet in game terms) Higher altitude allows you to fly over ground features, and can provide a strategic advantage over enemies if they are lower than you, since climbing is an expensive exercise in terms of steam and engine power.
A ship can be at a range of altitudes between 0 (ground level) and 20.
Remember that at times the ground itself may have an altutide, so you may need to increase your height to match unless you're comfortable with flying low. Low-altitude flying carries the risk of a crash if there is a piloting error.
Overspeed
In some cases (most usually a dive, or if a ship has a lot of extra power) an Airship can travel faster than it's design intended, which is called Overspeed. Each ship's Overspeed should be listed (in movement spaces) in it's Flight Box or in it's Overall Stats. If a ship travels further than it's Overspeed rating, it and each of it's compartments is subjected to an Overspeed Malfunction Roll of [D100 /4 ] + [Compartment damage] + [Overspeed spaces x 10] when the movement finishes.
Some tougher-built ships can handle a bit of Overspeed.
Stalls and Crashes
If at the beginning of it's round, an airship cannot generate enough Power to meet the minimum requirements flight requirements [100% Weight] it descends automatically and can make no other flight moves.
Less than 100% =1 Vert / round
Less than 75% = 2 Verts / round
Less than 50% = 3 Verts / round
Less than 25% = 4 Verts / round
If an airship drops to an altitude lower than the altitude of the ground, a crash occurs.
Vertical Crash damage is equal to [Bulk x Descent Rate] applied from the bottom structure up, from forward to aft.
Additionally, all crew aboard take a hit for [Descent Rate x10]
A crash onto ground that is the same altitude as the ship causes [Bulk /2 damage]
Additionally a ship can crash horizontally into terrain by flying into it.
Horizontal crash damage is equal to [Bulk x Speed] and is applied from the front or rear bottom structure, moving up and aft.
Additionally, all crew aboard take a hit for [Movement spaces travelled before impact]
Declaring piloting maneuvers
When indicating desired piloting maneuvers, it's easiest to list each maneuver in the order it should be performed.
For example:
Turn right 45 degrees
Move forward 4 spaces
Descend 2 Verts
etc...
Additionally it's acceptable to use statements such as 'Ascend as much as possible on available power.' Or 'go forward as much as possssible on available power' though you should be careful to avoid making your piloting rolls too difficult via this method.
MALFUNCTIONS
Whenever a compartment takes damage there is a chance a Malfunction will occur. Malfunctions can have a variety of effects, but in general will negatively effect the performance of the compartment, and can cause injury to the crew via explosion or fire.
A list of Malfunctions and their effects
When a compartment is, damaged a roll of [D100+Compartment Damage] is made and the Malfunction section of a compartment's Stat Box is used to determine wether a malfunction occurs, and what type of it does. Some compartments are less likely to suffer malfunctions than others, but the more damage a compartment receives, the greater the risk of a Malfunction becomes.
If a crewman wants to Repair a malfunction, they roll [D100+Repair] Vs. [Severity of malfunction]. If the player's result is higher, the severity decreases by the difference.
Making a Repair attempt uses an entire round.
FIREFIGHTING
Fire represents a very dangerous condition aboard ship. It can damage compartments and injure crew, cause malfunctions and spread through open areas of the ship to cause even more damage. If left unattended, fires will grow more severe over time.
Attempting to extinguish a fire requires a roll of [D100+Firefighting] Vs. [Severity of fire]. If the roll Firefighting roll is higher than the Severity, the Severity is reduced by the difference.
If a character is in or crosses through a compartment that is on fire they must make a check to see if they are harmed by smoke inhalation and the intense heat. The formula is: [D100+Firefighting] Vs. [Severity of Fire] If the Severity exceeds the defensive roll, 1 damage is dealt for every 10 points of difference. This damage is soakable through Toughness.
Attempting to fight a fire takes 1 Action.
FIRING WEAPONS
While there are other weapons it can employ, the primary weapon of an airship is the cannon.
Cannons have a number of stats that determine their attributes:
+Damage:The amount of damage inflicted by the cannon shot.
+Steam useage: The amount of Steam Presssure required to fire the cannon.
+Ammo: The amount of ammunition available to the cannon.
Firing
Firing the Cannon takes 1 Action. Firing requires some steam pressure to accomplish, the amount varying on the design of the cannon. To hit, the shooter must succeed on a roll of:
[D100 + Cannoneering] + [Target's bulk/Target's Range] - [Target's Evasion modifier] Vs. [Difficulty 100]
Accuracy Damage Bonus
For every 10 the result of the Firing roll is points over 100, the cannon shot receives a +1 to Damage, though this bonus cannot cause it to do more damage than its initial Damage rating. This helps to counter the effects of Range on damage, as described below.
Range and damage
A cannon shot's damage is decreased by 1 for every movement space between the firing ship and it's target. When a cannon shot's damage is reduced to 0 by this effect, the enemy is considered to be out of range by that weapon.
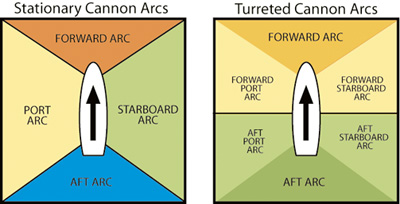
Arcs of Fire
Arcs of Fire refer to the area a cannon can engage targets in. Targets outside a cannon's arc of fire cannot be fired upon.
Cannons come in two types, stationary and turreted.
Stationary cannons can be mounted either to the front or back of the ship, or on the sides. Depending on where they are determines their facing, and arc of fire.
Forward-mounted guns may only hit the forward firing arc. They must be the forwardmost compartment on the Deck.
Rear-mounted guns may only hit the rear arc. They must be the sternmost compartment on the Deck.
Side-mounted guns may hit either of the side firing arcs, but only side one at a time.
Bow-Turreted guns may hit the Front Arc, Forward Port Arc or Forward Starboard Arc.
Aft-turreted guns may hit the Aft Arc, Aft Port Arc or Aft Starboard Arc
Traversing
Side-mounted and turreted cannons can be traversed to change their arc of fire. Side-mounted guns can only cover one side of the side arc at once, so if a cannon is oriented to the Port side arc, and the enemy is on the Starboard side, the gun must be Traversed to the other side so it can fire.
Turreted cannons can cover the Front or Rear arcs, or the Port or Starboard Side arcs, but only one at once.
A turreted canon can be traversed from one arc to any other available arc. Doing so requires 1 action.
By default at the beginning of a battle, Turreted cannons are pointed at the forward or aft acs.
Side-mounted cannons are considered stowed, and must be Traversed to either the port or starboard arcs before the can be fired.
Range of Engagement
In order to properly calibrate their cannon's sights for the shot, a Gunner should choose the range from the target at which they intends to fire, measured in movement distance. As soon as the enemy ship comes within this range, the cannon will fire. (provided it is within the cannon's Firing Arc, if not it will fire as soon as it is within the arc, so long as it is also still within engagement range) Setting a close range of engagement can increase the chance of a hit and the damage from that hit, but also increases the chances that the ship might not come close enough to be fired upon, effectively wasting a shot (though no ammunition or steam will be expended)
Gunners can also choose to fire at the end or beginning of their ship's movement.
Called Shot
In situations where airships are adjacent to another (1 movement space or less apart) or when a target is so large and a gunner so skilled that a miss is not possible (The result of [Gunner's Cannoneering] + [Target's bulk/target's Range] - [Target's Evasion modifier] is greater than 100) A gunner may make a called shot against a particular compartment of a ship. A called shot roll is made: [D100+Cannoneering] and a result of 100 or higher means the shot hits the indicated compartment, a lower roll means it will hit a randomly selected adjacent compartment. Note that if the target compartment is at the edge of a ship, the random target selection caused by a failed roll can cause the shot to miss.
As with regular Cannoneering rolls, 1 Damage is added for every 10 points over 100, though this cannot exceed the maximum damage of the cannon.
It may be wise for a gunner to specify a Called Shot compartment with every shot, in case one happens unexpectedly. If a Called Shot situation arises and the gunner has not selected a compartment, the shot location will be determined randomly as normal.
Overcharging
As with other machines, Cannons can be overcharged, however unlike most other machines, Overcharging a cannon DOES NOT REQUIRE AN ACTION, as it can be done as part of the firing process. Overcharging a Cannon of any type increases the Damage of it's shot.
In cases where Range Penalty on damage is concerned, the Damage of the Overcharged shot is considered to be the Damage of the cannon. I.E. a Damage 10 Cannon shot Overcharged to Damage 12 will travel 12 spaces. Likewise where a shot's Accuracy Bonus is concerned, the Overcharged damage is considered to be maximum damage the shot can not be increased beyond.
Failing an overcharge roll causes the shot to not fire (though it will still consume steam) and may cause a Malfunction.
GRAPPLING
Grappling allows one ship to attach itself to another, making it possible to move supplies or crewmembers from one to another. In less friendly circumstances they can be used to land boarding parties or hold a ship in place. Grappling another ship requires that it be adjacent (within 1 movement space) to the grappling ship, and the grappling compartment's Control position must be manned. Once a grapple has been fired, it requires a continuous stream of pressure to be expended for ever round it is in operation.
Grapples can be placed as Stationary Cannons, and have identical fIring arcs. Additionally, Grapples mounted on the lowermost deck of an airship can fire downwards to pick up objects off the ground, though other Airships cannnot be grappled in this manner.
Attaching a Grapple
If a friendly ship allows itself to be grappled, grappling automatically succeeds.
If the ship is unwilling then attaching a grapple works like a called cannon shot. The grappler should indicate what compartment they intend to attach the grapple to, and make a roll of [D100+Cannoneering] vs [Difficulty 100] If the roll succeeds, the grapple affixes to the desired compartment, if not it will hit an adjacent compartment, as with Called Shot.
Crossing a Grapple
Characters can exit one ship through the Grappling compartment and walk across the grapple to the other ship.
Crossing a grapple in friendly conditions does not require a roll, however if the ships are not friendly it requires a roll of
[D100+Agility] Vs. [Difficulty 30] to make it across successfully.
Failing the roll by 10 or less causes the character to become stuck, canceling the movement.
Failing by more than 20 causes the character to fall from the grapple.
Crossing a Grapple requires 1 Action.
Character's that cross the grapple are considered to be Scaling the side of the other ship, unless the Grapple is attached to a compartment with a destroyed bulkhead that allows entry, in which case they enter the ship.
In friendly conditions, grappling another grappling compartment, or any hatch or cargo hatch will also allow entry into the other ship.
Maneuvering while Grappled
While the grappled ships are connected, the ship with the greater total engine power controls the movement of both ships, but at a movement cost of the weight of both ships combined.
Breaking free of a Grapple
Breaking free of a grapple requires a pilot to succeed at a roll of [D100+Piloting+Bulk] vs. [Grapple Power]
If more than one Grapple is being employed add the collective power of all grapples together for this roll.
Picking up objects
If the Grappling Compartment is on the lowermost deck of the Airship, objects on the ground can be picked up and lifted from the ground, up to a Weight equal to the Grapple's Grapple Power. Grabbing objects off the ground requires the airship be stationary and at the same altitude as the ground. Objects can be successfully grappled and lifted with a roll of: [D100+Cannoneering] Vs. [Difficulty 100 - Size of object to be picked up]
(Multiple Objects can be packaged together into 'boxes' in order to make them easier to Grapple)
OVERCHARGING
Most equipment on an airship is built to operate within certain tolerances, but in many cases, they can be manipulated to work above and beyond their usual range of operation, increasing the output of the machine.
Overcharging takes 1 Action in most cases (Cannons being the notable exception)
Any single machine can only be Overcharged once in a round.
If a compartment can be overcharged, it will be indicated in it's stat box, along with the possible effects that overcharging can have. The Overcharge roll is [D100+Mechanical] and the effect is determined by consulting the Stat Box. It's possible for an Overcharge attempt to have no effect, and low rolls can even cause a malfunction.
In order to attempt an Overcharge, a person must be manning a Position in an appropriate compartment.
Common Overchargeable compartments:
Engine (Increases Engine Power)
Pressure Tank (Increases Pressure)
Cannon (Increases shot damage)
Grappler (Increases Grapple Power)
HAULING
There are a number of things that may need to be carted around the ship in Combat, the most common being Cannon Ammunition and Incapacitated crew.
Hauling is a movement roll combined with lifting, and had a difficulty:
[D100+Strength] Vs.
It's possible to try Hauling more than one object at a time, and in these cases, the total Size of all objects carried will be used.
Succeeding means the move works as planned. Failing means the Character was unable to move whatever they were tying to and instead does nothing that Action.
+Common Sizes:
Person: 10+Total Size of person carried
Cannon Shell: [Damage /2]
____________________
Next Section:
Port Phase
Airship Combat shares many similarities with regular combat, with a few notable exceptions. The biggest is that Airship Combat begins with an Airship Tactics roll. This roll is between whoever is in charge of each ship, and will determine the order the Airships will act. At some times it's advantageous to go first in an combat round, and other times later. The winner of the Airship Tactics roll gets to determine whether they want to go first or last.
The first ship to act will then declare actions for it's crew, and whoever else may be aboard will declare Actions as well. Once all Actions have been declared, the effects on the airship (it's movement, firing of guns, etc) will be calculated. Then the next ship's crew will declare their actions, and so on until all ships have gone and the next round begins.
This section will describe the aspects of airship combat.
The Combat Map
The position and altitude of friendly and enemy airships are plotted on the Combat Map, which serves to give an overall view of the situation. A grid is overlaid on the map to make it easier to get a sense of scale and plan moves. Each square is roughly equal to 1 Movement space, but is not exact.
Ships are indicated as black shapes, and have an arrow that indicates facing. The name of the ship will be beneath the shape, and a number indicating the ship's altitude will be alongside. If the battle takes place over land, there will be large numbers indicating the height that land is at.
As an example:
The Status Sheet
The purpose of the status sheet is to provide a display of the condition of the airship as a whole, including strength or armor, damage to any compartments, placement of crew, and the amount of expendables (Fuel, ammunition, etc) remaining.
The Status sheet is updated every combat round to keep track of what's happening inside the ship. Sheets will also be kept for an enemy vessels, but in general you won't be able to see them.
An example of a Status sheet:
The Status Sheet has 4 main features, Overall Stats, The Ship Diagram, the Compartment Stats, and the Hit Table.
The Overall Stats
Overall Stats are a series of basic stats about the ship, mostly useful for comparing one ship's stats to anothers at a glance. They are a simple representation of a ship's overall capabilities.
The Ship Diagram
The ship diagram displays the location and condition of the Compartments on the ship, as well as crew location and visual indicators of damage and malfunctions. It may also have some additional art for flavor.
Compartment Stats
Shows information in each individual compartment, organized by type. The information displayed will vary depending on compartment type.
Hit Table
This is used to determine the compartments hit by incoming fire, if the ship is struck.
Bulkheads and Compartments [/size]
Airships are composed of 2 fundamental parts, Bulkheads and Compartments. Bulkheads are structural, providing protection against damage. Compartments are what lies inside the bulkheads, rooms full of machinery that are often times vital parts of an Airship's function.
The Ship Diagram is made from a series of Compartments and Bulkheads.
Bulkheads
A Bulkhead's purpose is to absorb damage. Nothing short of a Cannon or other large explosive has enough power to damage a bulkhead, however once pierced they offer no real protection.
Here you can see an example of some Bulkheads. The number in the center of the bars is it's Armor, the amount of damage the bulkhead can take before it is destroyed. Occasionally the bulkheads are color-coded according to how much damage they can take.
The arrows pointing left and right in the lower-left of the box indicate how much armor remains on the side-planes. The left arrow indicates armor on the port side, the right arrow starboard side.
Compartments
A Compartment's Condition is a measurement of how much damage it can absorb before being destroyed. When a compartment's Condition reaches 0 it is completely wrecked and becomes unusable. Any time a Compartment is damaged there is a chance of a Malfunction occuring. A malfunction can take many forms, but usually they are bad news.
Compartment information is found on the upper left corner:
The blue section lists in the location and name of the Compartment. The C stands for Compartment, D for Deck and is determined by where in the ship the compartment is placed. The topmost deck is Deck 1 with numbers that increase for each deck under it. Compartments are numbered going from Aft to forward. The Name of the compartment can be anything, but will most usually refer to the function of the compartment.
The compartment's Condition is listed below in teal.
Some compartments may have a diagram in the background for flavor instead of just a plain background.
Compartment stats
Each Compartment on the ship will have a box with more information on it, usually grouped to the left or below of the Ship Diagram. Information pertinent to the compartment's operation will be listed. Additionally, if the compartment has a Position which can be manned, it will be listed. Positions can grant stats to the person manning them, or allow them to interface with the ship's systems in order to Overcharge them or perform other actions.
BASIC COMPARTMENT TYPES
While there are many different types of compartments these compartments are crucial to the functioning of an airship:
The Bridge
The Brains of the ship, Orders are given and the ship is piloted from the Bridge.
The Furnace (or Boiler)
Nearly all systems aboard the ship require Steam pressure to run, the Furnace is where this steam is generated.
The Pressure Tank
Stores the predsure generated by the Boiler.
Engines
Convert Steam pressure into the power needed to fly the ship.
MOVEMENT INSIDE AND OUTSIDE AIRSHIPS
All Compartments that are horizontally adjacent to each other are considered to be connected, and can be moved between at a cost of 1 Action as per normal.
Vertically adjacent Compartments may be traversed if they are connected by a Stairwell.
Hatches and Cargo Hatches provide access to the inside of the ship from outside, and vice versa, if they are open. They are closed by default. To board or exit a ship, there must be a Hatch or Cargo Hatch on the lowermost deck of the ship.
Decks
Decks are areas outside the ship that are intended to be walked on, and are indicated as green bars above the floor.
If a compartment adjacent to a Deck has a Hatch, the Deck may be accessed from that compartment (and likewise, the ship may be entered via the hatch from the Deck. The same is true of Stairwells that lead to a Deck.
Destroyed compartments
Compartments that have been wrecked are full of broken machinery and wire and as such are difficult to navigates, requiring a roll of [D100+Agility] Vs. [Total Size] to pass through successfully. Failing this roll causes the character to become stuck in the wrecked compartment.
Moving On Decks in Flight
If an airship is in flight with people on the deck, there is a chance they could be swept overboard by the wind. Anyone on deck when the ship moves must make a Roll of [D100+Acrobatics] Vs. [ #movement spaces travelled x 10]
Failing the roll by 10 or less causes the character to be swept over. During their next turn they must use 1 Action to stand up before doing anything else.
Failing by more than 20 causes the character to fall from the ship.
Scaling An Airship's sides
A Character can to climb along the outside of an airship's compartments by making a roll of:
D100+Agility] - [Total Size] Vs. [Difficulty 30]
For every Compartment they intend to travel.
Failing the roll by 10 or less causes the character to become stuck, cancelling the movement.
Failing by more than 20 causes the character to fall from the ship.
If an airship moves while characters are scaling it's sides, each scaling character must make a roll of:
[D100+Agility] - [Total size] Vs. [ # movement spaces travelled x 10]
Failing the roll by 10 or less causes the character to be swept over. During their next turn they must use 1 Action to right themselves before doing anything else.
Failing by more than 20 causes the character to fall from the ship.
Movement on the outside of an airship can be made diagonally.
A character can transfer from the front or sides of an airship, or climb up onto the deck as per this diagram:
Attempting to scale off the bottom off the airship is Not Recommended.
Entry through destroyed bulkheads
If a compartment's Bulkhead has been destroyed on the outside of the ship, that compartment can be entered from outside the ship by passing through the destroyed bulkhead as though it were a Hatch.
Changing Decks via destroyed floors/ceilings
If a floor or ceiling bulkhead has been destroyed a Character may pass between the two compartments as though they were connected by a Stairwell.
If Descending they must make a roll of [D100+Agility] Vs. [Total size] to avoid taking 1 point of damage by falling.
If Ascending the must make a roll of [D100+Agility] Vs. [10 +Total size] to avoid becoming stuck and wasting an Action.
Moving across a Compartment with a Destroyed floor
If a Character moves into a compartment with a destroyed floor bulkhead, they must make a roll of [D100+Agility] Vs. [Total size] to avoid falling down a deck and taking 1 point of damage by falling. It is possible to fall off a ship in this manner, by failing to cross the lowest deck of a ship.
PILOTING
Piloting an airship is a crucial and complex job aboard ship, requiring a considerable amount of calculation and strategic thinking on combat. As such it takes an entire round to perform. Piloting can only be done from the Helm Position in the Bridge compartment. If the helm is not manned, the airship cannot be maneuvered in any way.
There are several factors that must be taken into account when Piloting.
-Engine Power
-Steam Pressure
-Their own Piloting Stat
--------
Engine Power
Engine power is what keeps the airship aloft, and what moves it around the combat map. Moving the ship or turning it expends some amount of power, and when no power is left the ship can no longer be maneuvered that round. Engine Power replenishes itself fully at the beginning of every round. (Though it can be affected by malfunctions or Overcharging) Very generally, it can be said that the more engine power a ship has, the further it can be flown and the more maneuvers are available to it, though heavier ships require more power than lighter ones.
The amount of engine power needed for a given maneuver is listed on the Status Sheet under the heading of Flight.
Each round an airship is in flight, it requires a certain amount of power in order to stay in the air. This amount is subtracted automatically at the beginning of tha airship's turn, and the rest is available to make maneuvers with.
If there is not enough engine power (or steam power) to pay this initial cost, the airship will stall out and begin losing altitude, which could be the precursor to a crash. So it pays to husband your resources.
Steam Pressure
Every time a ship makes a maneuver that costs Engine Power, an equal amount of Steam Pressure is consumed from the ship's pressure tank. (The steam is used to drive the engines) Generally a pilot will be more limited by the amount of Engine Power available rather than steam pressure, but in certain tight situations it may be best to go easy in order to conserve pressure for firing cannons, or to build up a surplus to be used later.
Piloting Stat
In addition to Engine power and Steam, the last limiting factor is the Pilot's own skill, though this can be stretched, whereas the other two can not. Each maneuver a ship can perform (which will be covered shortly) will have a point value. The total point value of all moves made in that turn is used as a difficulty roll against the pilot's skill:
[D100+Piloting] Vs. [Total Maneuvering Points]
A success means everything is executed exactly as the pilot intends. A failure means the airship is mishandled and goes out of control, resulting in crew injury or perhaps even a crash.
A pilot can play it safe and only make maneuvers that's total stays within their skill level (under their piloting skill) or they can tempt fate with more maneuvers and increased risk.
The amount of Manuevering Points each maneuver is worth varies from ship to ship, and is displayed in the Status Sheet under the heading Piloting.
Airship Manuevers
-
Forward:
Moves the airship forward 1 movent space's worth of distance in the direction it is facing.
Reverse:
Moves the airship forward 1 movent space's worth of distance in the opposite direction of it's facing.
Turn:
A turn can be made in increments of 45 degrees (up to 180 degrees), and rotate the facing of the airship. After making a turn, an airship must move forward at least 1 movement space before it can turn again int he same round. A bigger turn is much harder than several smaller ones, so if your skill is not high it may be best to make incremental turns of 45 or 90 degrees.
Lateral:
Moves the airship 1 space perpendicular to it's facing.
Ascend:
Increases the Altitude of the Airship by 1 vert.
Descend:
Decreases the Altitude of the Airship by 1 vert.
Dive:
Pitches the airship forward, moving 1 movement space forward and 1 vert down. This is a difficult maneuver, but it's lower steam cost makes it a good way to cover a lot of ground quickly, if you have the altitude and piloting skill for it.
-
Evasive maneuvering
In combat, a skilled pilot can maneuver their ship in a way that makes it harder to hit by enemy gunners by adding a Evasion Modifier penalty to attacks against the ship.
Evasion Modifier = [D100+Airmanship] / [Bulk / 10]
Evasive Maneuvering is calculated as soon as a ship begins it's turn, or is fired upon. It it recalculated every round.
Altitude
Altitude in the game is measured in Verts, (1 Vert being about 500 feet in game terms) Higher altitude allows you to fly over ground features, and can provide a strategic advantage over enemies if they are lower than you, since climbing is an expensive exercise in terms of steam and engine power.
A ship can be at a range of altitudes between 0 (ground level) and 20.
Remember that at times the ground itself may have an altutide, so you may need to increase your height to match unless you're comfortable with flying low. Low-altitude flying carries the risk of a crash if there is a piloting error.
Overspeed
In some cases (most usually a dive, or if a ship has a lot of extra power) an Airship can travel faster than it's design intended, which is called Overspeed. Each ship's Overspeed should be listed (in movement spaces) in it's Flight Box or in it's Overall Stats. If a ship travels further than it's Overspeed rating, it and each of it's compartments is subjected to an Overspeed Malfunction Roll of [D100 /4 ] + [Compartment damage] + [Overspeed spaces x 10] when the movement finishes.
Some tougher-built ships can handle a bit of Overspeed.
Stalls and Crashes
If at the beginning of it's round, an airship cannot generate enough Power to meet the minimum requirements flight requirements [100% Weight] it descends automatically and can make no other flight moves.
Less than 100% =1 Vert / round
Less than 75% = 2 Verts / round
Less than 50% = 3 Verts / round
Less than 25% = 4 Verts / round
If an airship drops to an altitude lower than the altitude of the ground, a crash occurs.
Vertical Crash damage is equal to [Bulk x Descent Rate] applied from the bottom structure up, from forward to aft.
Additionally, all crew aboard take a hit for [Descent Rate x10]
A crash onto ground that is the same altitude as the ship causes [Bulk /2 damage]
Additionally a ship can crash horizontally into terrain by flying into it.
Horizontal crash damage is equal to [Bulk x Speed] and is applied from the front or rear bottom structure, moving up and aft.
Additionally, all crew aboard take a hit for [Movement spaces travelled before impact]
Declaring piloting maneuvers
When indicating desired piloting maneuvers, it's easiest to list each maneuver in the order it should be performed.
For example:
Turn right 45 degrees
Move forward 4 spaces
Descend 2 Verts
etc...
Additionally it's acceptable to use statements such as 'Ascend as much as possible on available power.' Or 'go forward as much as possssible on available power' though you should be careful to avoid making your piloting rolls too difficult via this method.
MALFUNCTIONS
Whenever a compartment takes damage there is a chance a Malfunction will occur. Malfunctions can have a variety of effects, but in general will negatively effect the performance of the compartment, and can cause injury to the crew via explosion or fire.
A list of Malfunctions and their effects
When a compartment is, damaged a roll of [D100+Compartment Damage] is made and the Malfunction section of a compartment's Stat Box is used to determine wether a malfunction occurs, and what type of it does. Some compartments are less likely to suffer malfunctions than others, but the more damage a compartment receives, the greater the risk of a Malfunction becomes.
If a crewman wants to Repair a malfunction, they roll [D100+Repair] Vs. [Severity of malfunction]. If the player's result is higher, the severity decreases by the difference.
Making a Repair attempt uses an entire round.
FIREFIGHTING
Fire represents a very dangerous condition aboard ship. It can damage compartments and injure crew, cause malfunctions and spread through open areas of the ship to cause even more damage. If left unattended, fires will grow more severe over time.
Attempting to extinguish a fire requires a roll of [D100+Firefighting] Vs. [Severity of fire]. If the roll Firefighting roll is higher than the Severity, the Severity is reduced by the difference.
If a character is in or crosses through a compartment that is on fire they must make a check to see if they are harmed by smoke inhalation and the intense heat. The formula is: [D100+Firefighting] Vs. [Severity of Fire] If the Severity exceeds the defensive roll, 1 damage is dealt for every 10 points of difference. This damage is soakable through Toughness.
Attempting to fight a fire takes 1 Action.
FIRING WEAPONS
While there are other weapons it can employ, the primary weapon of an airship is the cannon.
Cannons have a number of stats that determine their attributes:
+Damage:The amount of damage inflicted by the cannon shot.
+Steam useage: The amount of Steam Presssure required to fire the cannon.
+Ammo: The amount of ammunition available to the cannon.
Firing
Firing the Cannon takes 1 Action. Firing requires some steam pressure to accomplish, the amount varying on the design of the cannon. To hit, the shooter must succeed on a roll of:
[D100 + Cannoneering] + [Target's bulk/Target's Range] - [Target's Evasion modifier] Vs. [Difficulty 100]
Accuracy Damage Bonus
For every 10 the result of the Firing roll is points over 100, the cannon shot receives a +1 to Damage, though this bonus cannot cause it to do more damage than its initial Damage rating. This helps to counter the effects of Range on damage, as described below.
Range and damage
A cannon shot's damage is decreased by 1 for every movement space between the firing ship and it's target. When a cannon shot's damage is reduced to 0 by this effect, the enemy is considered to be out of range by that weapon.
Arcs of Fire
Arcs of Fire refer to the area a cannon can engage targets in. Targets outside a cannon's arc of fire cannot be fired upon.
Cannons come in two types, stationary and turreted.
Stationary cannons can be mounted either to the front or back of the ship, or on the sides. Depending on where they are determines their facing, and arc of fire.
Forward-mounted guns may only hit the forward firing arc. They must be the forwardmost compartment on the Deck.
Rear-mounted guns may only hit the rear arc. They must be the sternmost compartment on the Deck.
Side-mounted guns may hit either of the side firing arcs, but only side one at a time.
Bow-Turreted guns may hit the Front Arc, Forward Port Arc or Forward Starboard Arc.
Aft-turreted guns may hit the Aft Arc, Aft Port Arc or Aft Starboard Arc
Traversing
Side-mounted and turreted cannons can be traversed to change their arc of fire. Side-mounted guns can only cover one side of the side arc at once, so if a cannon is oriented to the Port side arc, and the enemy is on the Starboard side, the gun must be Traversed to the other side so it can fire.
Turreted cannons can cover the Front or Rear arcs, or the Port or Starboard Side arcs, but only one at once.
A turreted canon can be traversed from one arc to any other available arc. Doing so requires 1 action.
By default at the beginning of a battle, Turreted cannons are pointed at the forward or aft acs.
Side-mounted cannons are considered stowed, and must be Traversed to either the port or starboard arcs before the can be fired.
Range of Engagement
In order to properly calibrate their cannon's sights for the shot, a Gunner should choose the range from the target at which they intends to fire, measured in movement distance. As soon as the enemy ship comes within this range, the cannon will fire. (provided it is within the cannon's Firing Arc, if not it will fire as soon as it is within the arc, so long as it is also still within engagement range) Setting a close range of engagement can increase the chance of a hit and the damage from that hit, but also increases the chances that the ship might not come close enough to be fired upon, effectively wasting a shot (though no ammunition or steam will be expended)
Gunners can also choose to fire at the end or beginning of their ship's movement.
Called Shot
In situations where airships are adjacent to another (1 movement space or less apart) or when a target is so large and a gunner so skilled that a miss is not possible (The result of [Gunner's Cannoneering] + [Target's bulk/target's Range] - [Target's Evasion modifier] is greater than 100) A gunner may make a called shot against a particular compartment of a ship. A called shot roll is made: [D100+Cannoneering] and a result of 100 or higher means the shot hits the indicated compartment, a lower roll means it will hit a randomly selected adjacent compartment. Note that if the target compartment is at the edge of a ship, the random target selection caused by a failed roll can cause the shot to miss.
As with regular Cannoneering rolls, 1 Damage is added for every 10 points over 100, though this cannot exceed the maximum damage of the cannon.
It may be wise for a gunner to specify a Called Shot compartment with every shot, in case one happens unexpectedly. If a Called Shot situation arises and the gunner has not selected a compartment, the shot location will be determined randomly as normal.
Overcharging
As with other machines, Cannons can be overcharged, however unlike most other machines, Overcharging a cannon DOES NOT REQUIRE AN ACTION, as it can be done as part of the firing process. Overcharging a Cannon of any type increases the Damage of it's shot.
In cases where Range Penalty on damage is concerned, the Damage of the Overcharged shot is considered to be the Damage of the cannon. I.E. a Damage 10 Cannon shot Overcharged to Damage 12 will travel 12 spaces. Likewise where a shot's Accuracy Bonus is concerned, the Overcharged damage is considered to be maximum damage the shot can not be increased beyond.
Failing an overcharge roll causes the shot to not fire (though it will still consume steam) and may cause a Malfunction.
GRAPPLING
Grappling allows one ship to attach itself to another, making it possible to move supplies or crewmembers from one to another. In less friendly circumstances they can be used to land boarding parties or hold a ship in place. Grappling another ship requires that it be adjacent (within 1 movement space) to the grappling ship, and the grappling compartment's Control position must be manned. Once a grapple has been fired, it requires a continuous stream of pressure to be expended for ever round it is in operation.
Grapples can be placed as Stationary Cannons, and have identical fIring arcs. Additionally, Grapples mounted on the lowermost deck of an airship can fire downwards to pick up objects off the ground, though other Airships cannnot be grappled in this manner.
Attaching a Grapple
If a friendly ship allows itself to be grappled, grappling automatically succeeds.
If the ship is unwilling then attaching a grapple works like a called cannon shot. The grappler should indicate what compartment they intend to attach the grapple to, and make a roll of [D100+Cannoneering] vs [Difficulty 100] If the roll succeeds, the grapple affixes to the desired compartment, if not it will hit an adjacent compartment, as with Called Shot.
Crossing a Grapple
Characters can exit one ship through the Grappling compartment and walk across the grapple to the other ship.
Crossing a grapple in friendly conditions does not require a roll, however if the ships are not friendly it requires a roll of
[D100+Agility] Vs. [Difficulty 30] to make it across successfully.
Failing the roll by 10 or less causes the character to become stuck, canceling the movement.
Failing by more than 20 causes the character to fall from the grapple.
Crossing a Grapple requires 1 Action.
Character's that cross the grapple are considered to be Scaling the side of the other ship, unless the Grapple is attached to a compartment with a destroyed bulkhead that allows entry, in which case they enter the ship.
In friendly conditions, grappling another grappling compartment, or any hatch or cargo hatch will also allow entry into the other ship.
Maneuvering while Grappled
While the grappled ships are connected, the ship with the greater total engine power controls the movement of both ships, but at a movement cost of the weight of both ships combined.
Breaking free of a Grapple
Breaking free of a grapple requires a pilot to succeed at a roll of [D100+Piloting+Bulk] vs. [Grapple Power]
If more than one Grapple is being employed add the collective power of all grapples together for this roll.
Picking up objects
If the Grappling Compartment is on the lowermost deck of the Airship, objects on the ground can be picked up and lifted from the ground, up to a Weight equal to the Grapple's Grapple Power. Grabbing objects off the ground requires the airship be stationary and at the same altitude as the ground. Objects can be successfully grappled and lifted with a roll of: [D100+Cannoneering] Vs. [Difficulty 100 - Size of object to be picked up]
(Multiple Objects can be packaged together into 'boxes' in order to make them easier to Grapple)
OVERCHARGING
Most equipment on an airship is built to operate within certain tolerances, but in many cases, they can be manipulated to work above and beyond their usual range of operation, increasing the output of the machine.
Overcharging takes 1 Action in most cases (Cannons being the notable exception)
Any single machine can only be Overcharged once in a round.
If a compartment can be overcharged, it will be indicated in it's stat box, along with the possible effects that overcharging can have. The Overcharge roll is [D100+Mechanical] and the effect is determined by consulting the Stat Box. It's possible for an Overcharge attempt to have no effect, and low rolls can even cause a malfunction.
In order to attempt an Overcharge, a person must be manning a Position in an appropriate compartment.
Common Overchargeable compartments:
Engine (Increases Engine Power)
Pressure Tank (Increases Pressure)
Cannon (Increases shot damage)
Grappler (Increases Grapple Power)
HAULING
There are a number of things that may need to be carted around the ship in Combat, the most common being Cannon Ammunition and Incapacitated crew.
Hauling is a movement roll combined with lifting, and had a difficulty:
[D100+Strength] Vs.
It's possible to try Hauling more than one object at a time, and in these cases, the total Size of all objects carried will be used.
Succeeding means the move works as planned. Failing means the Character was unable to move whatever they were tying to and instead does nothing that Action.
+Common Sizes:
Person: 10+Total Size of person carried
Cannon Shell: [Damage /2]
____________________
Next Section:
Port Phase