

Post by Gravedust on Feb 2, 2014 0:57:16 GMT -8
---------------------------
Before we Begin:
It's important to note that while I've put some visual polish on it, this game as it stands is still very much unfinished, and has quite a long way to go before it reaches anything close to a final state. Please be aware that virtually any aspect of the game may change at virtually any time, though I will try to make alterations at points where they won't disrupt things very much. Please have patience while I work to correct problems that will certainly be uncovered during play. If you have suggestions about the game, I am happy to hear them and you can be sure that I will consider each one carefully, however please present them to me via a PM, and also please do not be offended if I do not respond to them. Getting into discussions over game mechanics takes a lot of time and energy for me, and having to defend and justify the changes I make (or do not make) saps a lot of what I find fun about making games like this. This is after all a hobby for me, so the main point is to have fun.
I also want to point out; Unlike many of my games which are co-op, this game is Team PvP. I do not plan to take part as a player, as I want to observe what designs the players come up with without my input. I will run the rounds but I won't control either side. While I think everyone here is a good sport and knows how to compete in a friendly manner, if playing against others is not your cup of tea this might not be the game for you. Likewise, if you are too competitive (or too much of a jerk) to compete in a friendly manner, then this is definitely not the game for you.
So, all that being said, thank you for playing, and let's have some fun.
~Grave
--------------------------------------------------------------------------------------------------------------------------------

STARSHIP COMMAND 101
==============================================
So you want to dominate the stars, 'eh? Well pull up a chair. Captaining a starship has never been easier, and this free community college seminar will teach you how!
----------------
+YOUR SHIP
First things first. Let's get familiar with the Ship display:
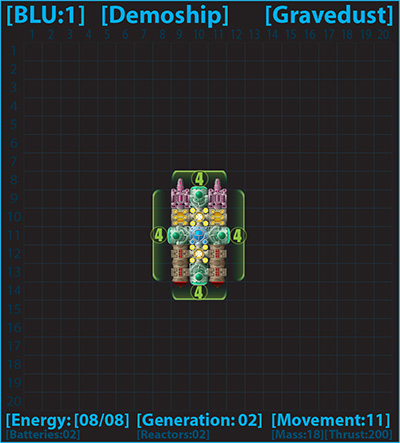
There's quite a bit of information here, so let's go over what's being displayed here.
+Ship Grid
At the center of the display you'll notice a diagram of a ship, in the middle of a grid of squares. This is called the Ship Grid or Ship Display.
Ships are comprised of a number of connected Compartments, and each Compartment contributes something to the ship's overall capabilities, be it the ability to fire weapons, maneuver, shield the ship from damage, and other bells and whistles. The type, number and placement of Compartments in the design determines what the overall abilities of your ship will be.
In addition to the compartment layout, the Ship Grid will also display additional information like shield strength, the amount of ammunition that remains for weapons that have limited ammo. In combat, it will also show which of your weapons have fired during your round and the effects of enemy shots if your ship was targeted.
The numbers from 1-20 that you see along the border of the grid are used to determine the results of enemy fire against your ship. In the tabletop version, the result of a roll on a D20 determines the path of a shot, and if that intersects a part of your ship then you take a hit at that location. Note that if the shot result -doesn't- come into contact with any part of your ship on the grid, then it misses entirely. So the size and shape of your ship determines how difficult it is to hit, and from what aspect. ( For instance, really wide ships are easier to hit from the front or rear, really long ships are easier to hit broadside, and in general small ships are harder to hit than large ones.)
You might notice that on the diagram, some compartments exceed the bounds of the squares they are in. (weapon barrels protruding into space, etc.) This is purely for looks, in game terms they only occupy one square and will only be destroyed if their base square is hit.
Note that your ship can take fire from the Front, Left, Right, or Rear, depending on it's relation to it's Attacker.
_________________________________________________________
+Callsign, Ship Name, & Player Name
At the top of the frame, above the Ship Grid is the ship's Callsign and Name, as well as the name of the person in control of the ship.
The Callsign is how your ship is referred to when giving orders. The Callsign is assigned to your ship and vary depending on the mission, but will usually include a color and a number. In this case the ship's callsign is BLU:1
The Ship's Name can be whatever the designer thinks sounds cool. This ship is Called Demoship, because that's what it is.
The Player Name is simply who is in control of the ship for the mission, in this case I've put myself (Gravedust) in control of this ship.
_________________________________________________________
+Ship's stats:
Beneath the Ship Grid, your ship's stats and their values are listed. These are Energy, Generation and Movement.
+Energy
Your ship uses Energy to do pretty much everything except move. The current amount of Energy your ship possesses is listed under the Energy stat. When your ship fires weapons, recharges it's shields or does anything else that requires Energy, it is subtracted from this total.
+Regen
Regen represents the amount of Energy your ship generates and will be added to the ship's Energy total at the beginning of it's turn*, so it can protect itself or lay waste to it's enemies or pretty much whatever. Regen fills up the Energy capacity of the ship, up to it's maximum.
+Movement
Movement is a measurement of how fast and maneuverable your ship is. In essence for each movement point, your ship can either move forward one space, or make a 90° turn to the left or right. Movement is a factor of the number of engines your ship has, the size of the ship, and the shape of the ship itself.
+Substats
Beneath the main stats and in somewhat dimmer text is the ship's substats. These show the elements that define the primary stats. (Mostly they are there to help the GM recalculate Movement in the event of an engine loss)
-----------------------------------------
!!!TRUE FACTS OF SCIENCE!!!
I'm sure you've heard about inertia how in space, an object in motion keeps moving unless acted upon by an outside force... Well as it turns out that is totally wrong. Because modern spaceships move only when thrust is applied, and stop as soon as it is removed. Also you may have also have heard that space is 3-dimensional and that all orientation is relative. This too is blatantly false. Modern space battles take place only on 2-dimensional planes, because that's how we like it.
-----------------------------------------
===========
+BATTLESPACE
===========
So now that you hopefully understand a bit about the ships, let's have a look at where they fight. Battlespace is set up on a grid (usually 40x40, though the size can vary.) Each ship in the will have a corresponding marker that shows it's position and facing, and various other units will be displayed here as well.
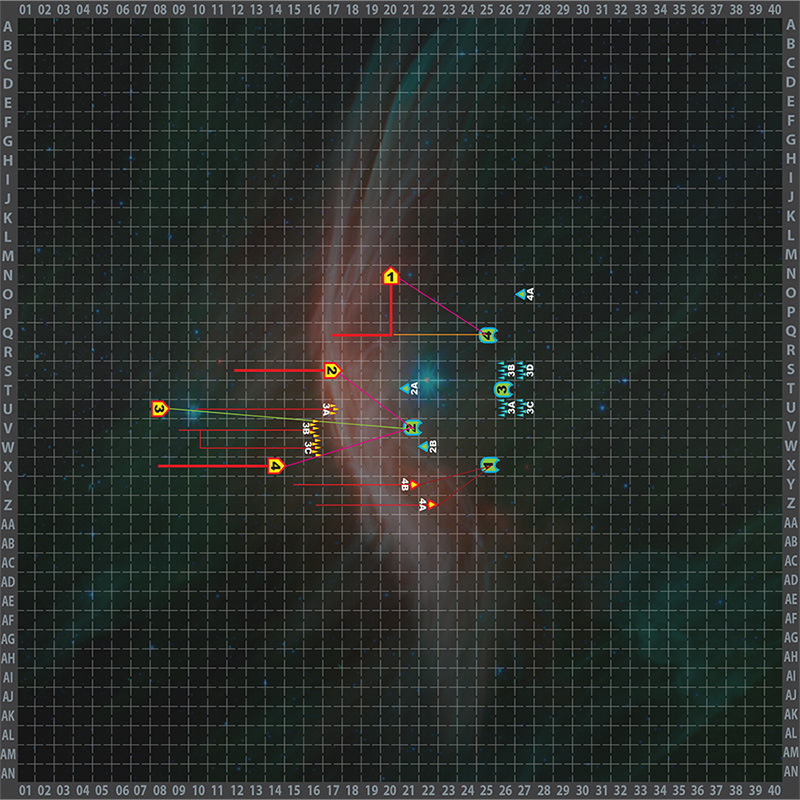
(Here you can see the Red team attacking the Blue. Ship movement is indicated by the thick red lines and weapons fire by thinner lines that intersect the target. The color indicates what type of weapon it is. You can also see fighters and missiles that have been launched by both sides. The Red fighters and missile are making moves and attacks as well.)
The Battlespace display has 4 cardinal directions, North (up) South (down) West (left) and East (right), which are used when issuing movement orders.
Along the edges are numbers and letters that can be used to identify individual squares. (for instance, RED4 is at X-14)
Battlespace is usually pretty empty aside from ships, but occasionally there may be moving obstacles on the board or zones with special attributes.
In a game, the Battlespace map will be surrounded by the displays of the ships involved in the Mission, where the results of this attack would be indicated. (All the hits and misses from the fired weapons would be visible on the Blue team's Displays)
==============================
MUCH ADO ABOUT WEAPONS AND COMBAT
==============================
There are a variety of weapons available to the aspiring Star Captain, and in this section we'll cover some of the finer points of interstellar conflict.
+Cannons & Launchers
There are 2 main categories of weaponry in use by ships, Cannons and Launchers. Cannons fire beams or other extremely fast moving projectiles that hit their targets instantly. (Indicated by thin colored lines on the Battlespace map) They are usually things like Lasers or Ion cannons or other types of gunlike weapons.
Launchers do not make attacks themselves, but instead dispense Remote Units like missiles and fighters, which can travel across Battlespace and make attacks on their own.
+Remote Units
Remote Unit is a catchall term for anything that is launched by a ship on the board and be controlled, such as Missiles and Fighters. Remote Units appear on the Battlespace map, move around on it and can be targeted by weaponry. Unlike true ships, Remote Units do not have a compartment grid and a simple die roll determines whether they are hit by enemy fire or not. In most cases, if a remote unit is hit it is instantly vaporized.
+Rate of fire
Each weapon on a ship can only be used ONCE per round.
+Weapon Damage
Weapon damage is measured in points. Each point of damage is enough to vaporize a single compartment on a ship. So for instance if you hit a ship with a 2-damage laser, 2 compartments in the weapon's path will be destroyed. (Or in the case of hitting a ship's shields, the shield will lose 2 points of it's ability to absorb damage)
+Multi-shot Weapons
Some weapons and Remotes have attacks which fire multiple times at the same target. This is noted in their Damage attribute. For instance: [ Damage: 1(x3) ] Means that when the weapon is fired, 3 D20s are rolled to determine hit locations on the target's Gird, and if any of those rolls hit they cause 1 point of damage where they strike.
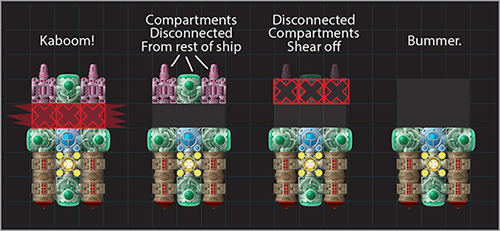
+Shearing
If a compartment, (or a group of them) become disconnected from the rest of the ship by having the compartments around it destroyed, it shears off the ship and is counted as destroyed at well. In the case of really big shears, the part of the ship that has the Bridge in it is considered the part that stays, and the rest is sheared away.
+Weapon Facing and Arcs of Fire
One very important detail about a ship is which direction its weapons are facing. The facing of a weapon determines what Firing Arc the weapon belongs to, which in turn determines the areas the weapon covers on the battlespace map. There are 4 firing arcs, (Forward, Port, Starboard and Aft.) and in order for a weapon to fire at a target, the target must be inside the weapon's firing arc.
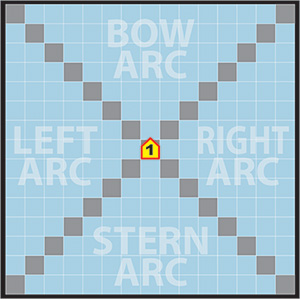
Note the grey squares. These are "Blind Spots" that are not covered by any firing arcs, and where weapons therefore cannot shoot.
It's important to note that what firing arc points where depends on the orientation of the ship.
Launchers are also effected by Weapon facing. When they launch their Remote Units, the launcher's facing determines what square next to the ship the remote will appear in. Remotes cannot be launched into a square that is already occupied, so if you are launching multiple remotes in the same Arc, you will have to launch, move your ship a square, then launch again.
+Weapon Range
Cannon-type weapons in the game have a range, which is the furthest that it can fire measured in Battlespace squares. Outside of a weapon's maximum range, no attacks are possible. When figuring out the range to a target that is diagonal to your ship, count the squares over to, and then up or down towards the target. No need to get all Pythagorean.
One important thing to note is that being at a closer range does not improve your chances of hitting a target, weapons are just as accurate at maximum range as they are at point-blank range.
+Ammo
In addition to requiring energy to use, some Launcher-Type weapons also consume ammunition. Ammo is housed in special compartments separate from the Launchers, and will display the number of shots remaining.
==========
TAKING TURNS
==========
This is a turn-based game, and while I'm reasonably certain you know what that means, I'm going to explain it anyway for the sake of diligence.
Players are organized into teams, and when a team's Turn arrives, they give orders to their ships. These orders are acted out, and once they have been completed the results are shown on the game board. It then becomes the next team's Turn. Pretty simple.
So in a nutshell, while it's your Turn, you can submit orders. Usually you will have at least several hours and usually about a day to figure out what you want to do with your turn.
===========
GIVING ORDERS
===========
You can command your ships to perform actions basically by just listing what you want then to do, in the order you want them to do it in. There are, however, some conventions in place in order to prevent orders from being misinterpreted and/or to keep thing from being more if a pain in the ass for the GM than they need to be. ((Seriously, I've got a lot to do, please make life easy for me by giving me orders that are easy to follow.))
First and foremost, always give orders in bold. to make them easier to find amongst whatever other chatter might be going on.
Secondly, always make sure to identify the ship you are controlling by it's callsign, before you issue your orders.
When giving orders make sure to separate them on different lines. This makes them much easier to follow.
For instance:
BLU1 (Demoship):
> Do this
> Then do this
> Now do this
> and now do this
This is very easy to parse out and enact since the GM can check it off line by line as they go.
And now let's cover what you can order your ship to do:
_________________________________________________________
+MOVE
Moves your ship. Pretty self-explanatory, really. You can use one of your ship's Movement points to either move it 1 space forward in the direction it is facing, or turn it 90° to the Left or Right of it's current facing.
When ordering forward movement, Make sure you indicate the number of squares you want to travel. When ordering a turn make sure you indicate the direction, and if you are changing facing multiple times in the same square, make sure to indicate that as well. (For instance turning right twice will make your ship perform a 180).
Sample orders:
BLU1 (Demoship)
>Move Forward 2 (going West)
>Turn Right (face North)
>Move Forward 3 (going North)
>Turn 2 Left (facing South)
While moving is pretty straightforward, there are a few little details that need to be remembered when it comes to units moving through areas occupied by other units.
• Friendly starships may pass 'through' one another when maneuvering, though they cannot both occupy the same square when they stop. If ordered into the same square, whichever ship moves second will wind up a square short. (Movement order is determined by post order)
• Enemy Ships block movement, it is not possible to move your ship through them.
• Remote units may have different reactions to friendly or enemy units passing through them, which will be detailed in the Remote Unit's writeup. Some may simply be displaced out of the squares they are in, but others might launch attacks against any ship that wanders into a square with them, including friendlies. (Missile carriers and those operating around them should exercise caution when giving orders to avoid fratricide.)
_________________________________________________________
+ATTACKING WITH CANNON TYPE WEAPONS
Shooting is more or less your primary method of interacting with your fellow players, and you're likely to do a lot of it. In your orders make sure to identify the correct target, and what weapons should be fired at it.
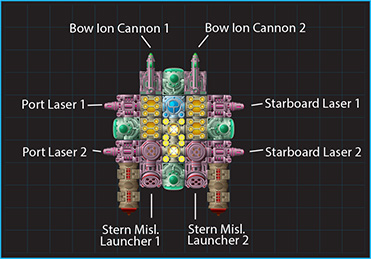
Note that if you have more than one of a kind of weapon (and it's very likely you will) you may need to identify which specific weapon to shoot.
For this purpose, weapons can be identified by their facing and location. For instance a laser with a Port (Left) facing is called a Port Laser. (a Laser facing the bow (Front) is a Bow Laser, etc.) If there are more than one type weapons with the same facing, they are numbered from Left to Right (for Bow and Stern weapons) and Front to Back (For Port and Starboard facing weapons)
Sample orders:
BLU1 (Demoship)
>Fire Bow Ion Cannon 2 at BLUE2
>Launch Stern Missile Launcher 2.
If you are shooting a Cannon-type weapon, make sure that the enemy is in range of your weapon, and in the correct firing arc, etc. Note that you can rotate your ship so that a target is inside a weapon's arc, fire the weapon, and then turn again to put the ship in a different weapon's arc, and then fire that weapon. Just make sure to give those orders in the correct order.
Sample orders:
BLU1 (Demoship)
>Turn 1 Right
>Fire Bow Lasers
>Turn 1 Left
_________________________________________________________
+ATTACKING WITH REMOTE UNITS
Remote units your ship has launched will appear in Battlespace and will be given a designation that is based off your ship's. For instance if your ship is RED1, your remotes will be designated using your ship's number, with a letter after it, as in: 1A, 1B, 1C, etc.
You can give orders to your remotes in the same manner as you do your ship. Make sure you indicate what remote you are giving orders to, and since some remotes have unique movement behavior, make sure you understand how they can be moved before you try to fly them around. Also remember that remote units can take no actions on the round they were launched.
((So obviously bigger ships can fit a lot of remote launchers and spit out a ton of remote units, and generate a gigantic order pile… I'm not putting in a restriction on the number of active remote units per ship yet, but just be aware that's a possibility if things start getting ridiculous. ))
_________________________________________________________
+SHIP MANAGEMENT
Depending on what compartments your ship has, there may be other things you can order as well, such as shield recharging, or activating certain compartments' special attributes. Any special features that a compartment has that can be activated will be detailed in the Compartment's Writeup.
================
BATTLES AND SCORING
================
Since ships can sometimes take a loooong time to destroy, the objective will usually not be to eliminate the other team but rather to outscore them in terms of points. Points are tallied at the end of the mission, and are awarded for:
• Completing mission objectives.
Sometimes missions will have objectives that can be completed for points.
• Damaging enemy ships.
One point is awarded to your team for every enemy compartment that is destroyed. Destroying remote units does not count.
• Disabling enemy ships
Ships that can not move (due to having insufficient thrust) or make an attack (no weapons left, or no remaining batteries) are considered to be Disabled, and are removed from play during their turn. Disabled ships score 1 point for every compartment on the ship for the enemy team.
• Knocking out enemy ships.
If an enemy ship's Bridge is destroyed, a point is gained for every compartment on that ship, plus a bonus point for every 5 compartments on the ship.
-Other scoring details-
• Standing down
If your ship is severely damaged, rather than keep it in the fight you can instead choose to Stand Down, which removes your ship from the battle immediately and gives the enemy 5 points, but also prevents the enemy from scoring extra points by shooting up your crippled vessel. You can only Stand down at the beginning of your turn.
• Retreating
As an alternative to standing down, If you move your ship off of the battlespace map, it removes your ship from play and only gives the enemy 2 points.
• Failing to Disengage
Battles will usually have a time limit, indicated by a number of rounds. Once the time limit has been reached, the battle ends and any ships remaining in Battlespace score 5 points for the enemy team. Make sure your ship can make it out of Battlespace in time!
====================
+DEALING WITH STALEMATES
====================
Occasionally you will have crippled ships or ships with low damage outputs trying to fight one another, but neither is very capable of damaging the other. In cases such as this, some rule changes may be enacted by the GM to increase the deadliness of the encounter so the game can conclude sooner or at least is more interesting that a sissy slap-fight in space.
• Auto shot correction.
If a shot misses, it is rerolled once to give it another chance of hitting.
• Global Shield disruption.
Shields can no longer be recharged.
========
+THAT'S IT
========
That's it!
Hopefully now you know all you need to in order to run a ship. If not, direct any questions you have to the GM.
If you're interested in playing, please make a brief post in the Game Chat thread to sign up.
Don't forget to also check out the Ship Building thread, which will tell you how to make your own ships.
Before we Begin:
It's important to note that while I've put some visual polish on it, this game as it stands is still very much unfinished, and has quite a long way to go before it reaches anything close to a final state. Please be aware that virtually any aspect of the game may change at virtually any time, though I will try to make alterations at points where they won't disrupt things very much. Please have patience while I work to correct problems that will certainly be uncovered during play. If you have suggestions about the game, I am happy to hear them and you can be sure that I will consider each one carefully, however please present them to me via a PM, and also please do not be offended if I do not respond to them. Getting into discussions over game mechanics takes a lot of time and energy for me, and having to defend and justify the changes I make (or do not make) saps a lot of what I find fun about making games like this. This is after all a hobby for me, so the main point is to have fun.
I also want to point out; Unlike many of my games which are co-op, this game is Team PvP. I do not plan to take part as a player, as I want to observe what designs the players come up with without my input. I will run the rounds but I won't control either side. While I think everyone here is a good sport and knows how to compete in a friendly manner, if playing against others is not your cup of tea this might not be the game for you. Likewise, if you are too competitive (or too much of a jerk) to compete in a friendly manner, then this is definitely not the game for you.

So, all that being said, thank you for playing, and let's have some fun.

~Grave
--------------------------------------------------------------------------------------------------------------------------------
Welcome to the Space Jam
==========================================STARSHIP COMMAND 101
==============================================
So you want to dominate the stars, 'eh? Well pull up a chair. Captaining a starship has never been easier, and this free community college seminar will teach you how!
----------------
+YOUR SHIP
First things first. Let's get familiar with the Ship display:
There's quite a bit of information here, so let's go over what's being displayed here.
+Ship Grid
At the center of the display you'll notice a diagram of a ship, in the middle of a grid of squares. This is called the Ship Grid or Ship Display.
Ships are comprised of a number of connected Compartments, and each Compartment contributes something to the ship's overall capabilities, be it the ability to fire weapons, maneuver, shield the ship from damage, and other bells and whistles. The type, number and placement of Compartments in the design determines what the overall abilities of your ship will be.
In addition to the compartment layout, the Ship Grid will also display additional information like shield strength, the amount of ammunition that remains for weapons that have limited ammo. In combat, it will also show which of your weapons have fired during your round and the effects of enemy shots if your ship was targeted.
The numbers from 1-20 that you see along the border of the grid are used to determine the results of enemy fire against your ship. In the tabletop version, the result of a roll on a D20 determines the path of a shot, and if that intersects a part of your ship then you take a hit at that location. Note that if the shot result -doesn't- come into contact with any part of your ship on the grid, then it misses entirely. So the size and shape of your ship determines how difficult it is to hit, and from what aspect. ( For instance, really wide ships are easier to hit from the front or rear, really long ships are easier to hit broadside, and in general small ships are harder to hit than large ones.)
You might notice that on the diagram, some compartments exceed the bounds of the squares they are in. (weapon barrels protruding into space, etc.) This is purely for looks, in game terms they only occupy one square and will only be destroyed if their base square is hit.
Note that your ship can take fire from the Front, Left, Right, or Rear, depending on it's relation to it's Attacker.
_________________________________________________________
+Callsign, Ship Name, & Player Name
At the top of the frame, above the Ship Grid is the ship's Callsign and Name, as well as the name of the person in control of the ship.
The Callsign is how your ship is referred to when giving orders. The Callsign is assigned to your ship and vary depending on the mission, but will usually include a color and a number. In this case the ship's callsign is BLU:1
The Ship's Name can be whatever the designer thinks sounds cool. This ship is Called Demoship, because that's what it is.
The Player Name is simply who is in control of the ship for the mission, in this case I've put myself (Gravedust) in control of this ship.
_________________________________________________________
+Ship's stats:
Beneath the Ship Grid, your ship's stats and their values are listed. These are Energy, Generation and Movement.
+Energy
Your ship uses Energy to do pretty much everything except move. The current amount of Energy your ship possesses is listed under the Energy stat. When your ship fires weapons, recharges it's shields or does anything else that requires Energy, it is subtracted from this total.
+Regen
Regen represents the amount of Energy your ship generates and will be added to the ship's Energy total at the beginning of it's turn*, so it can protect itself or lay waste to it's enemies or pretty much whatever. Regen fills up the Energy capacity of the ship, up to it's maximum.
*This is true for tabletop, but due to the way the forums work, energy is handled slightly differently and added at the end of the ship's turn after all it's actions have been completed. But it works out almost the same either way. Another difference in tabletop is the ability to choose which battery energy is put into or drawn from, but this is more trouble than it's worth to model for the forum version.
+Movement
Movement is a measurement of how fast and maneuverable your ship is. In essence for each movement point, your ship can either move forward one space, or make a 90° turn to the left or right. Movement is a factor of the number of engines your ship has, the size of the ship, and the shape of the ship itself.
+Substats
Beneath the main stats and in somewhat dimmer text is the ship's substats. These show the elements that define the primary stats. (Mostly they are there to help the GM recalculate Movement in the event of an engine loss)
-----------------------------------------
!!!TRUE FACTS OF SCIENCE!!!
I'm sure you've heard about inertia how in space, an object in motion keeps moving unless acted upon by an outside force... Well as it turns out that is totally wrong. Because modern spaceships move only when thrust is applied, and stop as soon as it is removed. Also you may have also have heard that space is 3-dimensional and that all orientation is relative. This too is blatantly false. Modern space battles take place only on 2-dimensional planes, because that's how we like it.
-----------------------------------------
+BATTLESPACE
===========
So now that you hopefully understand a bit about the ships, let's have a look at where they fight. Battlespace is set up on a grid (usually 40x40, though the size can vary.) Each ship in the will have a corresponding marker that shows it's position and facing, and various other units will be displayed here as well.
(Here you can see the Red team attacking the Blue. Ship movement is indicated by the thick red lines and weapons fire by thinner lines that intersect the target. The color indicates what type of weapon it is. You can also see fighters and missiles that have been launched by both sides. The Red fighters and missile are making moves and attacks as well.)
The Battlespace display has 4 cardinal directions, North (up) South (down) West (left) and East (right), which are used when issuing movement orders.
Along the edges are numbers and letters that can be used to identify individual squares. (for instance, RED4 is at X-14)
Battlespace is usually pretty empty aside from ships, but occasionally there may be moving obstacles on the board or zones with special attributes.
In a game, the Battlespace map will be surrounded by the displays of the ships involved in the Mission, where the results of this attack would be indicated. (All the hits and misses from the fired weapons would be visible on the Blue team's Displays)
==============================
MUCH ADO ABOUT WEAPONS AND COMBAT
==============================
There are a variety of weapons available to the aspiring Star Captain, and in this section we'll cover some of the finer points of interstellar conflict.
+Cannons & Launchers
There are 2 main categories of weaponry in use by ships, Cannons and Launchers. Cannons fire beams or other extremely fast moving projectiles that hit their targets instantly. (Indicated by thin colored lines on the Battlespace map) They are usually things like Lasers or Ion cannons or other types of gunlike weapons.
Launchers do not make attacks themselves, but instead dispense Remote Units like missiles and fighters, which can travel across Battlespace and make attacks on their own.
+Remote Units
Remote Unit is a catchall term for anything that is launched by a ship on the board and be controlled, such as Missiles and Fighters. Remote Units appear on the Battlespace map, move around on it and can be targeted by weaponry. Unlike true ships, Remote Units do not have a compartment grid and a simple die roll determines whether they are hit by enemy fire or not. In most cases, if a remote unit is hit it is instantly vaporized.
+Rate of fire
Each weapon on a ship can only be used ONCE per round.
+Weapon Damage
Weapon damage is measured in points. Each point of damage is enough to vaporize a single compartment on a ship. So for instance if you hit a ship with a 2-damage laser, 2 compartments in the weapon's path will be destroyed. (Or in the case of hitting a ship's shields, the shield will lose 2 points of it's ability to absorb damage)
+Multi-shot Weapons
Some weapons and Remotes have attacks which fire multiple times at the same target. This is noted in their Damage attribute. For instance: [ Damage: 1(x3) ] Means that when the weapon is fired, 3 D20s are rolled to determine hit locations on the target's Gird, and if any of those rolls hit they cause 1 point of damage where they strike.
+Shearing
If a compartment, (or a group of them) become disconnected from the rest of the ship by having the compartments around it destroyed, it shears off the ship and is counted as destroyed at well. In the case of really big shears, the part of the ship that has the Bridge in it is considered the part that stays, and the rest is sheared away.
+Weapon Facing and Arcs of Fire
One very important detail about a ship is which direction its weapons are facing. The facing of a weapon determines what Firing Arc the weapon belongs to, which in turn determines the areas the weapon covers on the battlespace map. There are 4 firing arcs, (Forward, Port, Starboard and Aft.) and in order for a weapon to fire at a target, the target must be inside the weapon's firing arc.
Note the grey squares. These are "Blind Spots" that are not covered by any firing arcs, and where weapons therefore cannot shoot.
It's important to note that what firing arc points where depends on the orientation of the ship.
Launchers are also effected by Weapon facing. When they launch their Remote Units, the launcher's facing determines what square next to the ship the remote will appear in. Remotes cannot be launched into a square that is already occupied, so if you are launching multiple remotes in the same Arc, you will have to launch, move your ship a square, then launch again.
+Weapon Range
Cannon-type weapons in the game have a range, which is the furthest that it can fire measured in Battlespace squares. Outside of a weapon's maximum range, no attacks are possible. When figuring out the range to a target that is diagonal to your ship, count the squares over to, and then up or down towards the target. No need to get all Pythagorean.
One important thing to note is that being at a closer range does not improve your chances of hitting a target, weapons are just as accurate at maximum range as they are at point-blank range.
+Ammo
In addition to requiring energy to use, some Launcher-Type weapons also consume ammunition. Ammo is housed in special compartments separate from the Launchers, and will display the number of shots remaining.
TAKING TURNS
==========
This is a turn-based game, and while I'm reasonably certain you know what that means, I'm going to explain it anyway for the sake of diligence.
Players are organized into teams, and when a team's Turn arrives, they give orders to their ships. These orders are acted out, and once they have been completed the results are shown on the game board. It then becomes the next team's Turn. Pretty simple.
So in a nutshell, while it's your Turn, you can submit orders. Usually you will have at least several hours and usually about a day to figure out what you want to do with your turn.
GIVING ORDERS
===========
You can command your ships to perform actions basically by just listing what you want then to do, in the order you want them to do it in. There are, however, some conventions in place in order to prevent orders from being misinterpreted and/or to keep thing from being more if a pain in the ass for the GM than they need to be. ((Seriously, I've got a lot to do, please make life easy for me by giving me orders that are easy to follow.))
First and foremost, always give orders in bold. to make them easier to find amongst whatever other chatter might be going on.
Secondly, always make sure to identify the ship you are controlling by it's callsign, before you issue your orders.
When giving orders make sure to separate them on different lines. This makes them much easier to follow.
For instance:
BLU1 (Demoship):
> Do this
> Then do this
> Now do this
> and now do this
This is very easy to parse out and enact since the GM can check it off line by line as they go.
And now let's cover what you can order your ship to do:
_________________________________________________________
+MOVE
Moves your ship. Pretty self-explanatory, really. You can use one of your ship's Movement points to either move it 1 space forward in the direction it is facing, or turn it 90° to the Left or Right of it's current facing.
When ordering forward movement, Make sure you indicate the number of squares you want to travel. When ordering a turn make sure you indicate the direction, and if you are changing facing multiple times in the same square, make sure to indicate that as well. (For instance turning right twice will make your ship perform a 180).
Sample orders:
BLU1 (Demoship)
>Move Forward 2 (going West)
>Turn Right (face North)
>Move Forward 3 (going North)
>Turn 2 Left (facing South)
While moving is pretty straightforward, there are a few little details that need to be remembered when it comes to units moving through areas occupied by other units.
• Friendly starships may pass 'through' one another when maneuvering, though they cannot both occupy the same square when they stop. If ordered into the same square, whichever ship moves second will wind up a square short. (Movement order is determined by post order)
(In the tabletop version, no ship can pass through another, (making which units move when and where a bit more strategic) but this would probably be a bit too much of a pain in the ass when dealing with orders given simultaneously, so friendlies can pass through one another for the forum version.)
• Enemy Ships block movement, it is not possible to move your ship through them.
• Remote units may have different reactions to friendly or enemy units passing through them, which will be detailed in the Remote Unit's writeup. Some may simply be displaced out of the squares they are in, but others might launch attacks against any ship that wanders into a square with them, including friendlies. (Missile carriers and those operating around them should exercise caution when giving orders to avoid fratricide.)
_________________________________________________________
+ATTACKING WITH CANNON TYPE WEAPONS
Shooting is more or less your primary method of interacting with your fellow players, and you're likely to do a lot of it. In your orders make sure to identify the correct target, and what weapons should be fired at it.
Note that if you have more than one of a kind of weapon (and it's very likely you will) you may need to identify which specific weapon to shoot.
For this purpose, weapons can be identified by their facing and location. For instance a laser with a Port (Left) facing is called a Port Laser. (a Laser facing the bow (Front) is a Bow Laser, etc.) If there are more than one type weapons with the same facing, they are numbered from Left to Right (for Bow and Stern weapons) and Front to Back (For Port and Starboard facing weapons)
Sample orders:
BLU1 (Demoship)
>Fire Bow Ion Cannon 2 at BLUE2
>Launch Stern Missile Launcher 2.
If you are shooting a Cannon-type weapon, make sure that the enemy is in range of your weapon, and in the correct firing arc, etc. Note that you can rotate your ship so that a target is inside a weapon's arc, fire the weapon, and then turn again to put the ship in a different weapon's arc, and then fire that weapon. Just make sure to give those orders in the correct order.
Sample orders:
BLU1 (Demoship)
>Turn 1 Right
>Fire Bow Lasers
>Turn 1 Left
_________________________________________________________
+ATTACKING WITH REMOTE UNITS
Remote units your ship has launched will appear in Battlespace and will be given a designation that is based off your ship's. For instance if your ship is RED1, your remotes will be designated using your ship's number, with a letter after it, as in: 1A, 1B, 1C, etc.
You can give orders to your remotes in the same manner as you do your ship. Make sure you indicate what remote you are giving orders to, and since some remotes have unique movement behavior, make sure you understand how they can be moved before you try to fly them around. Also remember that remote units can take no actions on the round they were launched.
((So obviously bigger ships can fit a lot of remote launchers and spit out a ton of remote units, and generate a gigantic order pile… I'm not putting in a restriction on the number of active remote units per ship yet, but just be aware that's a possibility if things start getting ridiculous.
))_________________________________________________________
+SHIP MANAGEMENT
Depending on what compartments your ship has, there may be other things you can order as well, such as shield recharging, or activating certain compartments' special attributes. Any special features that a compartment has that can be activated will be detailed in the Compartment's Writeup.
================
BATTLES AND SCORING
================
Since ships can sometimes take a loooong time to destroy, the objective will usually not be to eliminate the other team but rather to outscore them in terms of points. Points are tallied at the end of the mission, and are awarded for:
• Completing mission objectives.
Sometimes missions will have objectives that can be completed for points.
• Damaging enemy ships.
One point is awarded to your team for every enemy compartment that is destroyed. Destroying remote units does not count.
• Disabling enemy ships
Ships that can not move (due to having insufficient thrust) or make an attack (no weapons left, or no remaining batteries) are considered to be Disabled, and are removed from play during their turn. Disabled ships score 1 point for every compartment on the ship for the enemy team.
• Knocking out enemy ships.
If an enemy ship's Bridge is destroyed, a point is gained for every compartment on that ship, plus a bonus point for every 5 compartments on the ship.
-Other scoring details-
• Standing down
If your ship is severely damaged, rather than keep it in the fight you can instead choose to Stand Down, which removes your ship from the battle immediately and gives the enemy 5 points, but also prevents the enemy from scoring extra points by shooting up your crippled vessel. You can only Stand down at the beginning of your turn.
• Retreating
As an alternative to standing down, If you move your ship off of the battlespace map, it removes your ship from play and only gives the enemy 2 points.
• Failing to Disengage
Battles will usually have a time limit, indicated by a number of rounds. Once the time limit has been reached, the battle ends and any ships remaining in Battlespace score 5 points for the enemy team. Make sure your ship can make it out of Battlespace in time!
====================
+DEALING WITH STALEMATES
====================
Occasionally you will have crippled ships or ships with low damage outputs trying to fight one another, but neither is very capable of damaging the other. In cases such as this, some rule changes may be enacted by the GM to increase the deadliness of the encounter so the game can conclude sooner or at least is more interesting that a sissy slap-fight in space.
• Auto shot correction.
If a shot misses, it is rerolled once to give it another chance of hitting.
• Global Shield disruption.
Shields can no longer be recharged.
========
+THAT'S IT
========
That's it!
Hopefully now you know all you need to in order to run a ship. If not, direct any questions you have to the GM.
If you're interested in playing, please make a brief post in the Game Chat thread to sign up.
Don't forget to also check out the Ship Building thread, which will tell you how to make your own ships.